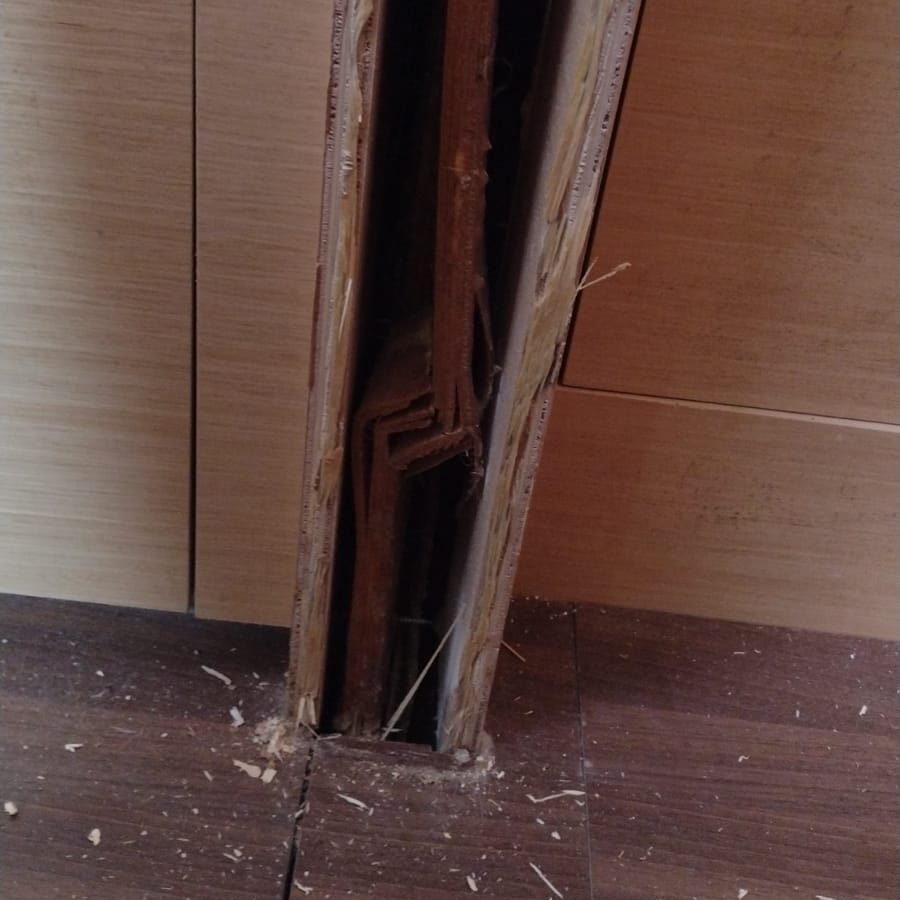
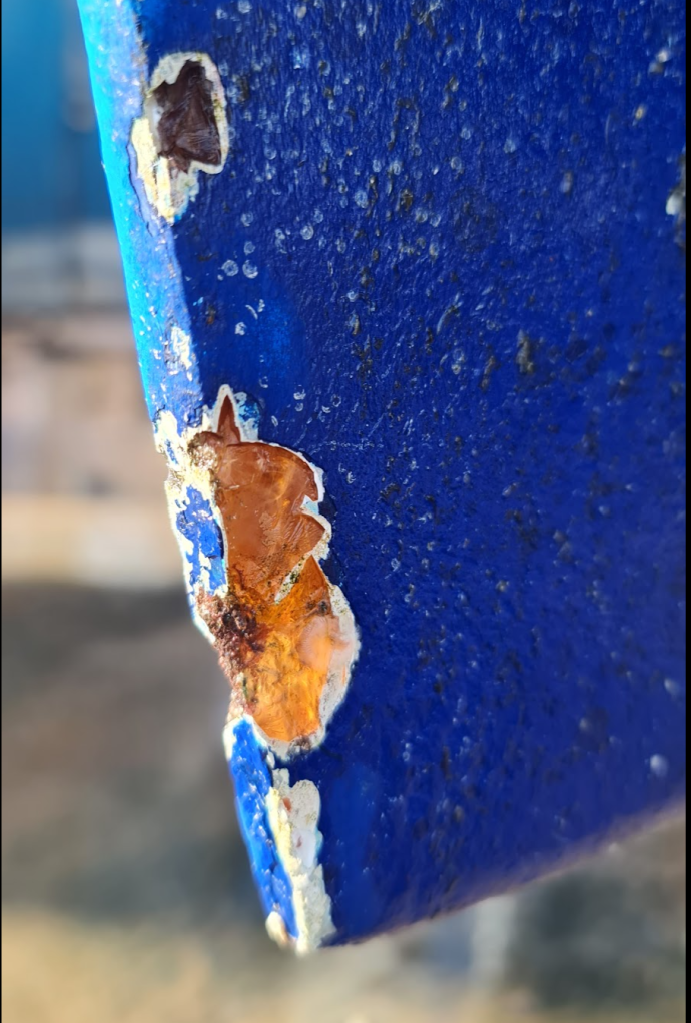
You remember this bulkhead inspection we shared with you a few weeks back? Well, this Lagoon 450F unit from 2011 was indeed affected by the now infamous 450 bulkhead-gate. However, Lagoon is stepping up to deal with this properly, as they did with the previous units we encountered over the same issue.
The owners submitted the photos of the inspection on both Starboard and Port side to the Lagoon service center, and after some more questioning on the boat’s history (nothing to report of significance), this unit was added to their bulkhead-solving listing.
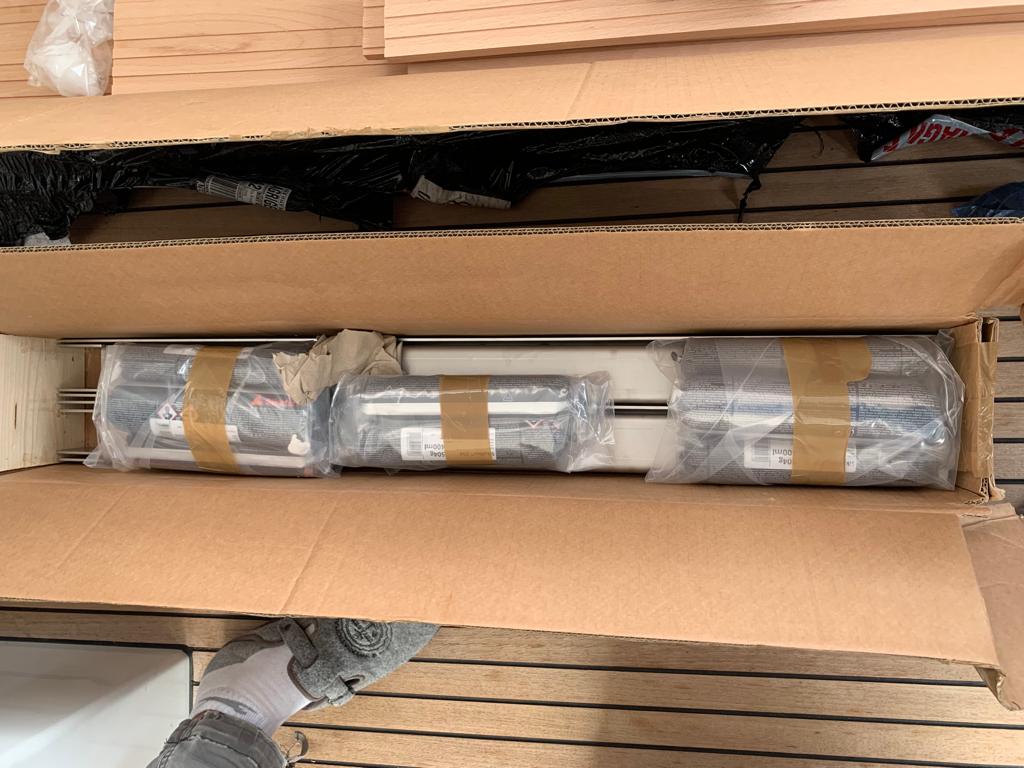
After a few weeks, we received the repair kit, properly packaged in three boxes.
Those are the metal U-shaped frames which will reinforce the bulkhead on both sides.
Even the Sikaflex is included in the repair kit.
Since we are expected to break down the forward doors rims, new ones are included in the repair kit.
In the meantime, should you have concerns about your own bulkhead, you can look out for potential bulkhead failure tale signs:
Panel behind the cabin sofa cushions, just next to the mast compression spot, bulking out, or using only three out of the original four screws (we’ve seen once this panel support area so twisted, it was using only two screws).
Port and Starboard side doors to forward cabins (or forward head in owner version) no longer square.
And since this is quite a sensitive matter, with less-than accurate information published into sailor’s forums by frustrated owners or by other catamaran brands trolls, may I suggest you read the official information provided by Lagoon on this matter before making up your mind?
… and many other works to bring back this 10 years old unit to its original condition.
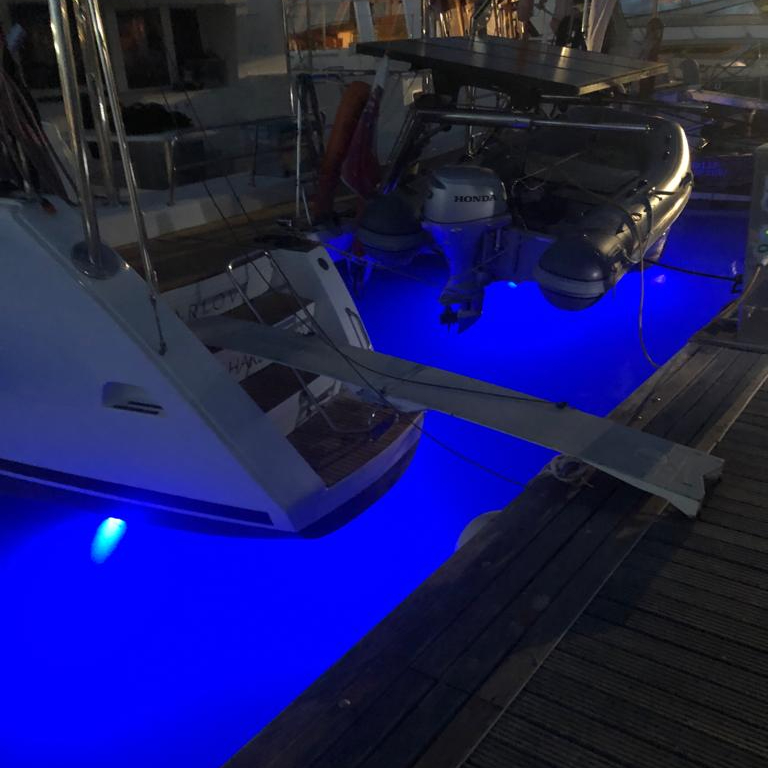
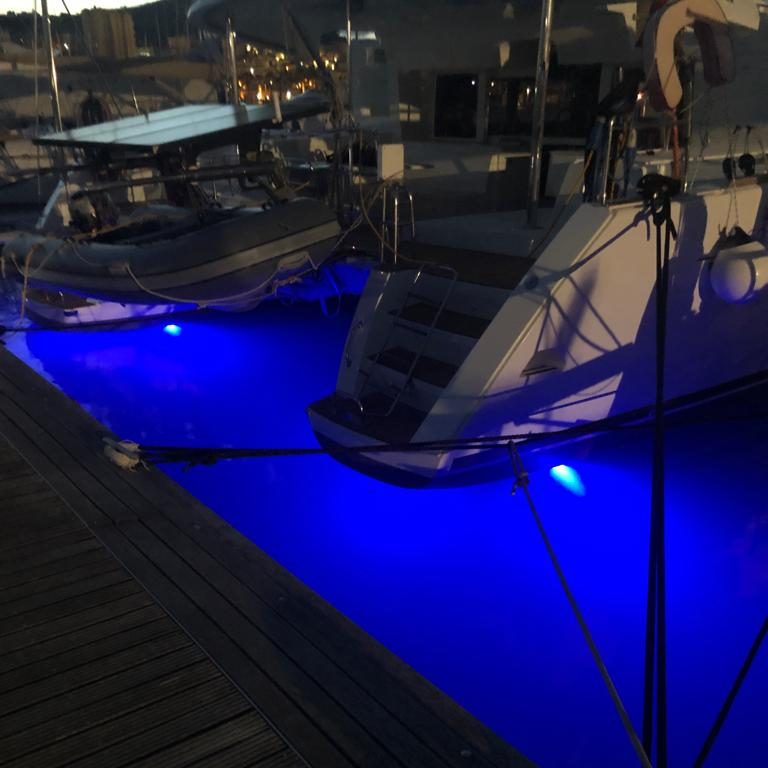
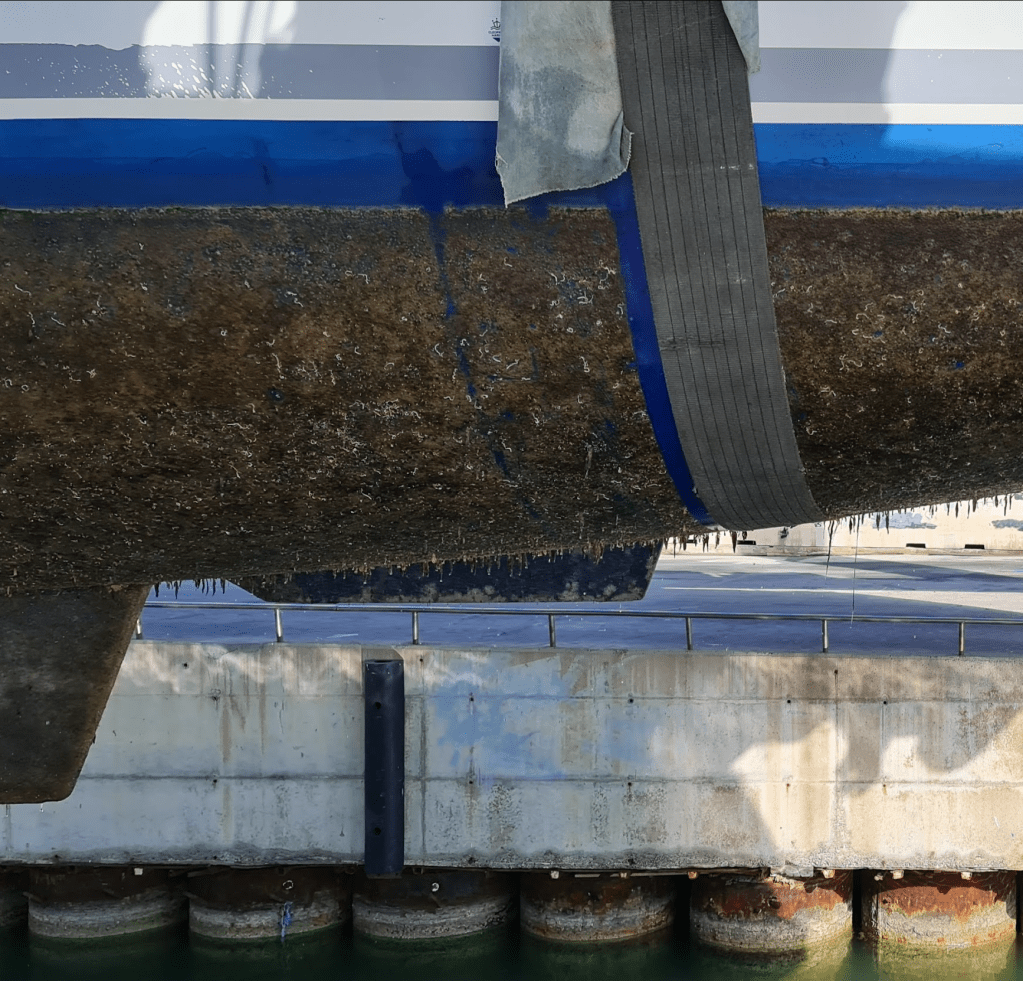
At the time, she was still on the hard, and we couldn’t share any photo of the finished job with the underwater lights. Now she’s back in the water, for a little time in Marina Cala del Sole, and the owner allowed us to make some photos so that we can share how it looks.
Whatever opinion every sailor has regarding this feature (See the pros & cons here) we think the result is beautiful, and that swimming under the moonlight will never be the same 🙂
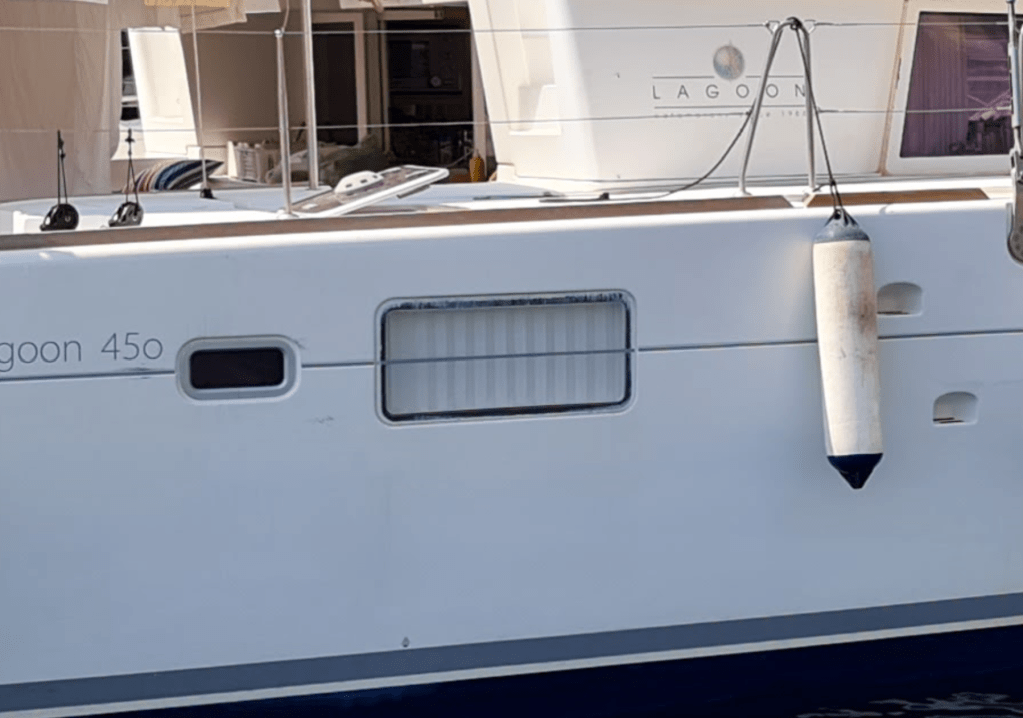
On the early years of the range, Lagoon fitted their catamaran with an external privacy and sun white cover. While contributing to the sleek look of the hulls, it would usually deteriorate over time, with fender abrasion, no matter how carful their owner would be in placing them. More recent units would have their protection set on the inside side of the window, putting the usual sources of wear & tear out of the mix.
After 10 years, the ones on this hull would in fact be so worn out that they no longer provided any protection against the sun, nor privacy after sundown. As a side project in a global refit for this Lagoon 450F, their new owners asked us to change replace all four of them with new covers.
In this photo, we can see how the dotted protection has been completely erased, requiring the inside curtains to be pulled at all times for privacy.
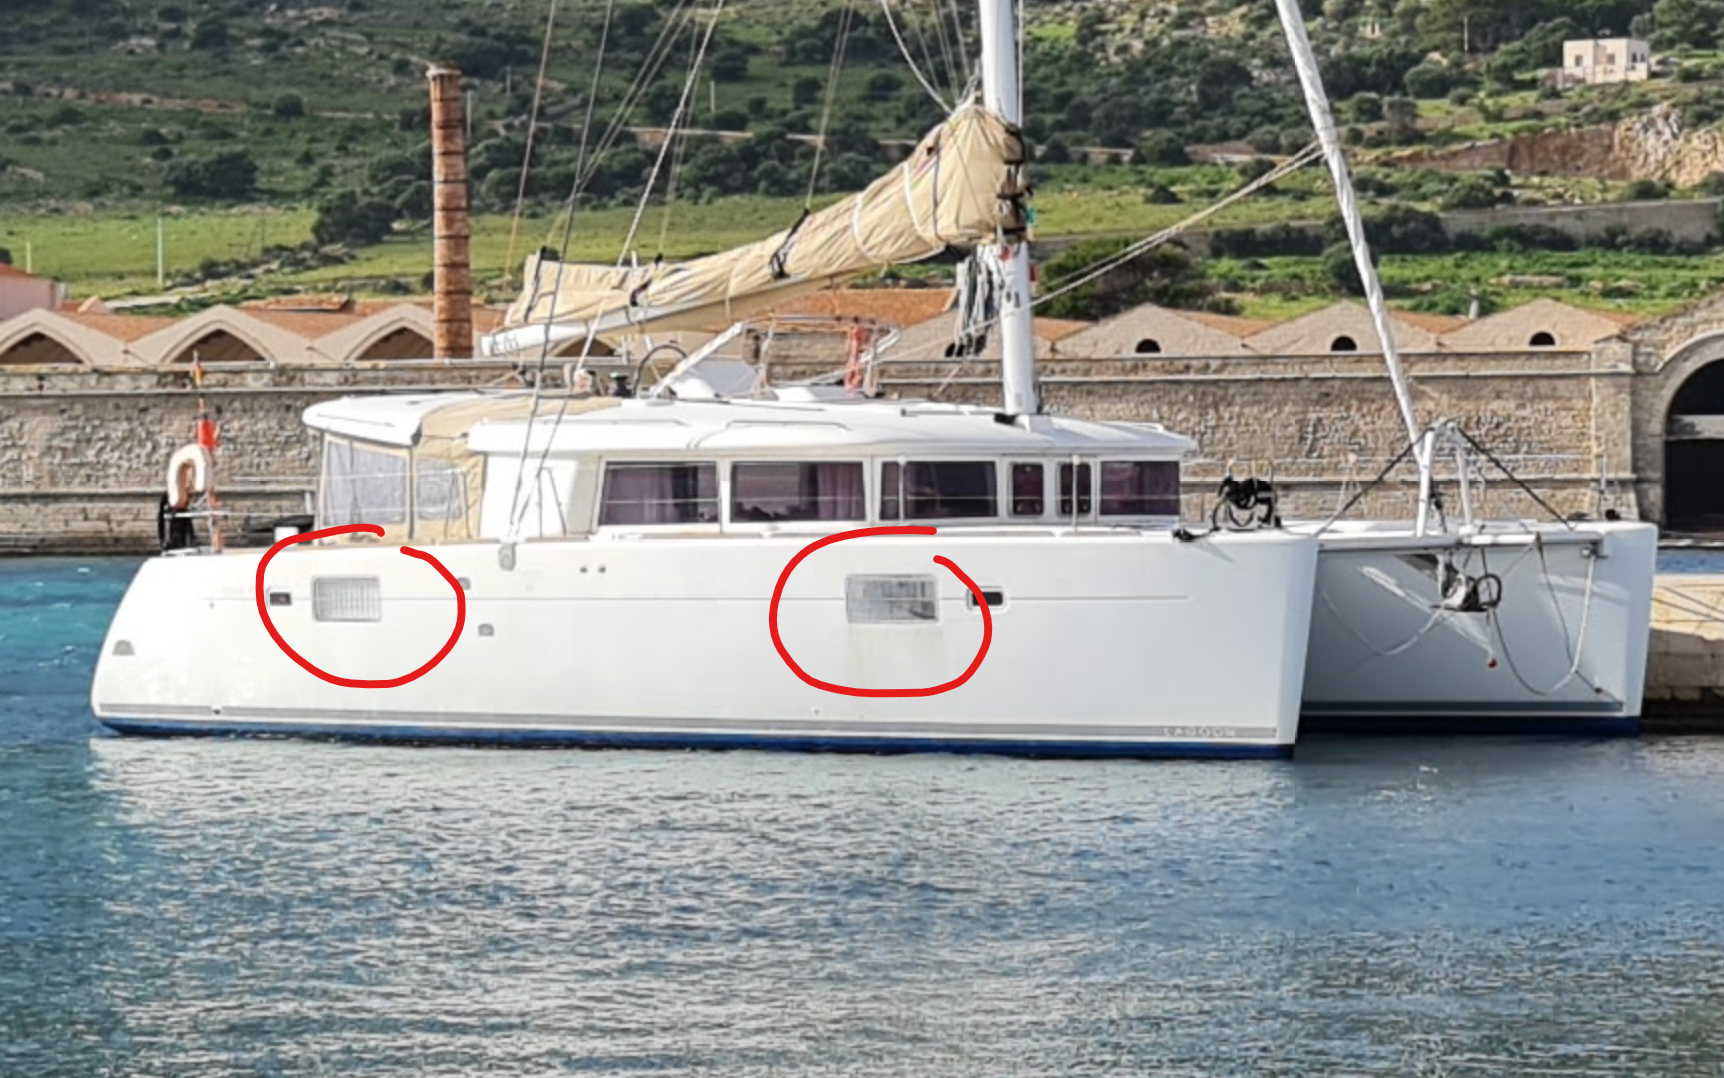
And this is the case for all four large windows of the unit (photo courtesy of the previous owner, with the boat docked in beautiful Favignana harbor, on our turf, should you need a motivation to visit 🙂
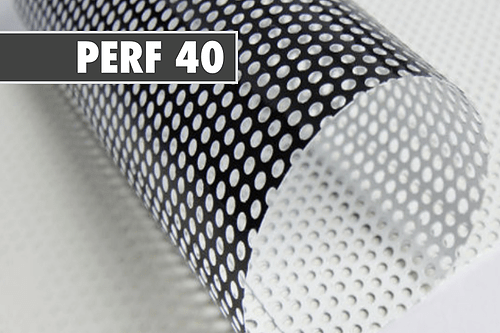
After doing quite some extensive research online , we came up with the Lagoon original reference for a replacement kit:
And at the time, the price was 500€, which seemed quite expensive for a set of adhesive stuff. As a matter of fact, after some further online search, it soon became quite clear that we could use a standard product easily purchased online, with costs only a fraction of Lagoon’s proposition.
We came up with “Pellicola decorativa PVC microforato 40%“, a product made by italian firm MC SERRAMENTI SRL (Milano), witch fitted all our requirements for a total cost of only 150€ (1,52 x 2,5 m).
Specifications
Supporto: PVC polimero 140 micron
Adesivo: solvente in poliacrilato rimovibile
Protezione: carta siliconica 100 micron
Colore: bianco
Applicazione: esterna
Garanzia: 3 anni
Resistenza termica: da -20° a 80°
The new owners validated our proposition, and with the procurement behind us, the actual work could start.
First of all, we would advice against the use of acetone, as it could damage the seals and the plexiglass itself. It’s not overly difficult to move out the existing cover, but should you need help, you can use some silicone remover; wood alcohol (Methanol) would also do the trick, but it is now considered to be a health hazard. At this stage it is essential to insure that no damage happens to the plexiglass, as those would be difficult to repair.
Then we cleaned thoroughly the windows surfaces, wiped them dry, and installed the new covers, being careful to get all the wrinkles out of the way.
We used a razor knife to cut the cover to the exact shape of the windows, being careful not to damage the seals.
And this is how it was meant to look like 🙂
Again a very satisfying project, as the result is so visible to everyone. Together with the polishing of the hull, we did bring this 10 years old unit to its original looks.
Provided we anticipate the purchase of the material – and be aware that procurement leadtimes have exploded over the recent weeks – this can be done in a few hours, while the boat is in the water. Should you wish to replace yours, give us a call.
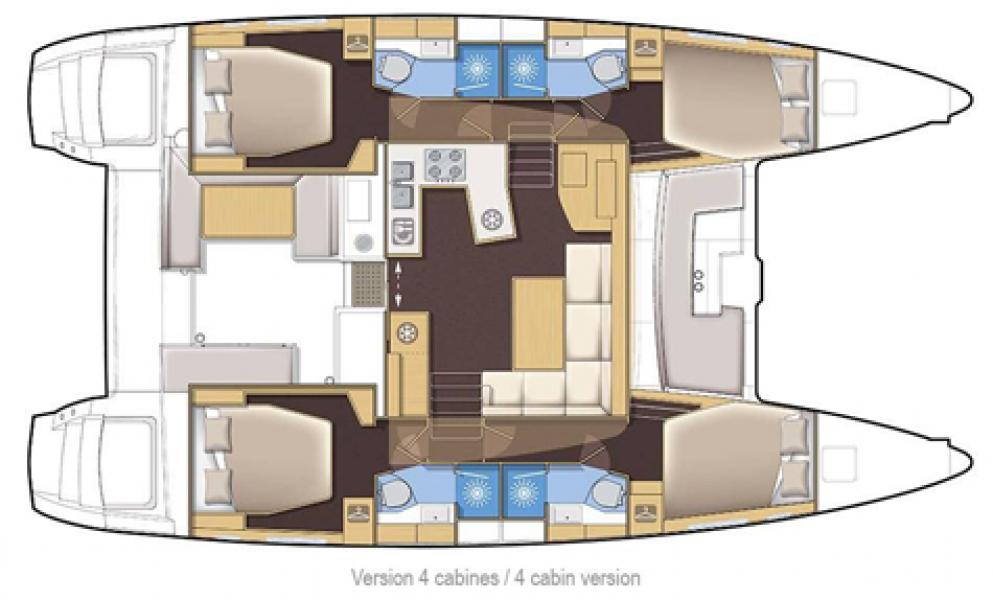
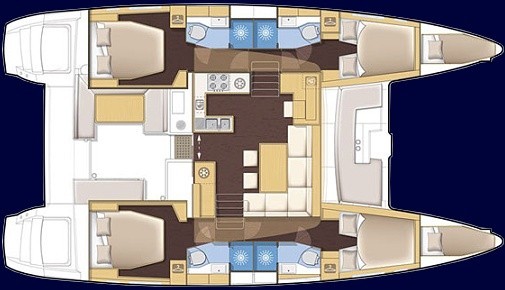
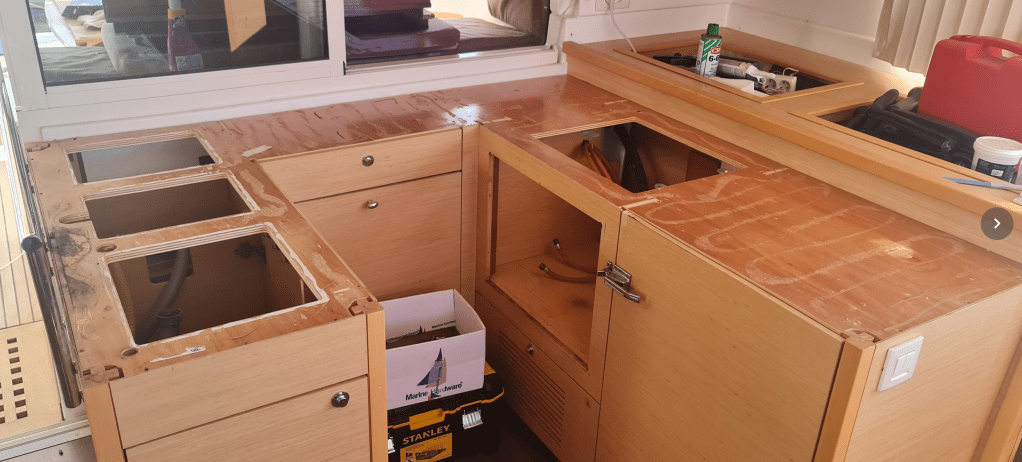
The transition of ownership is usually the opportunity for some serious refit. This is what happened with this Lagoon 450F on which the new owners wanted a complete refit of the galley. It was about time, as the boat was still with all her legacy installation.
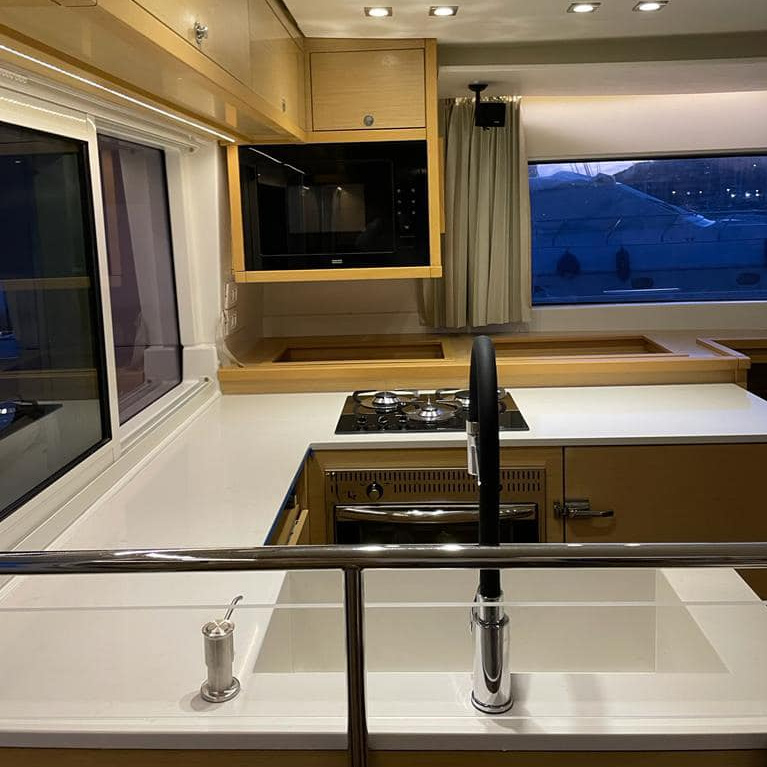
The conception of this galley was the initial one on the Lagoon 450 range, with sinks facing Starboard. On more recent units, the U-shaped galley is now open on Starboard, and the sinks are facing the back cockpit.
Recent design galleyInitial design galley
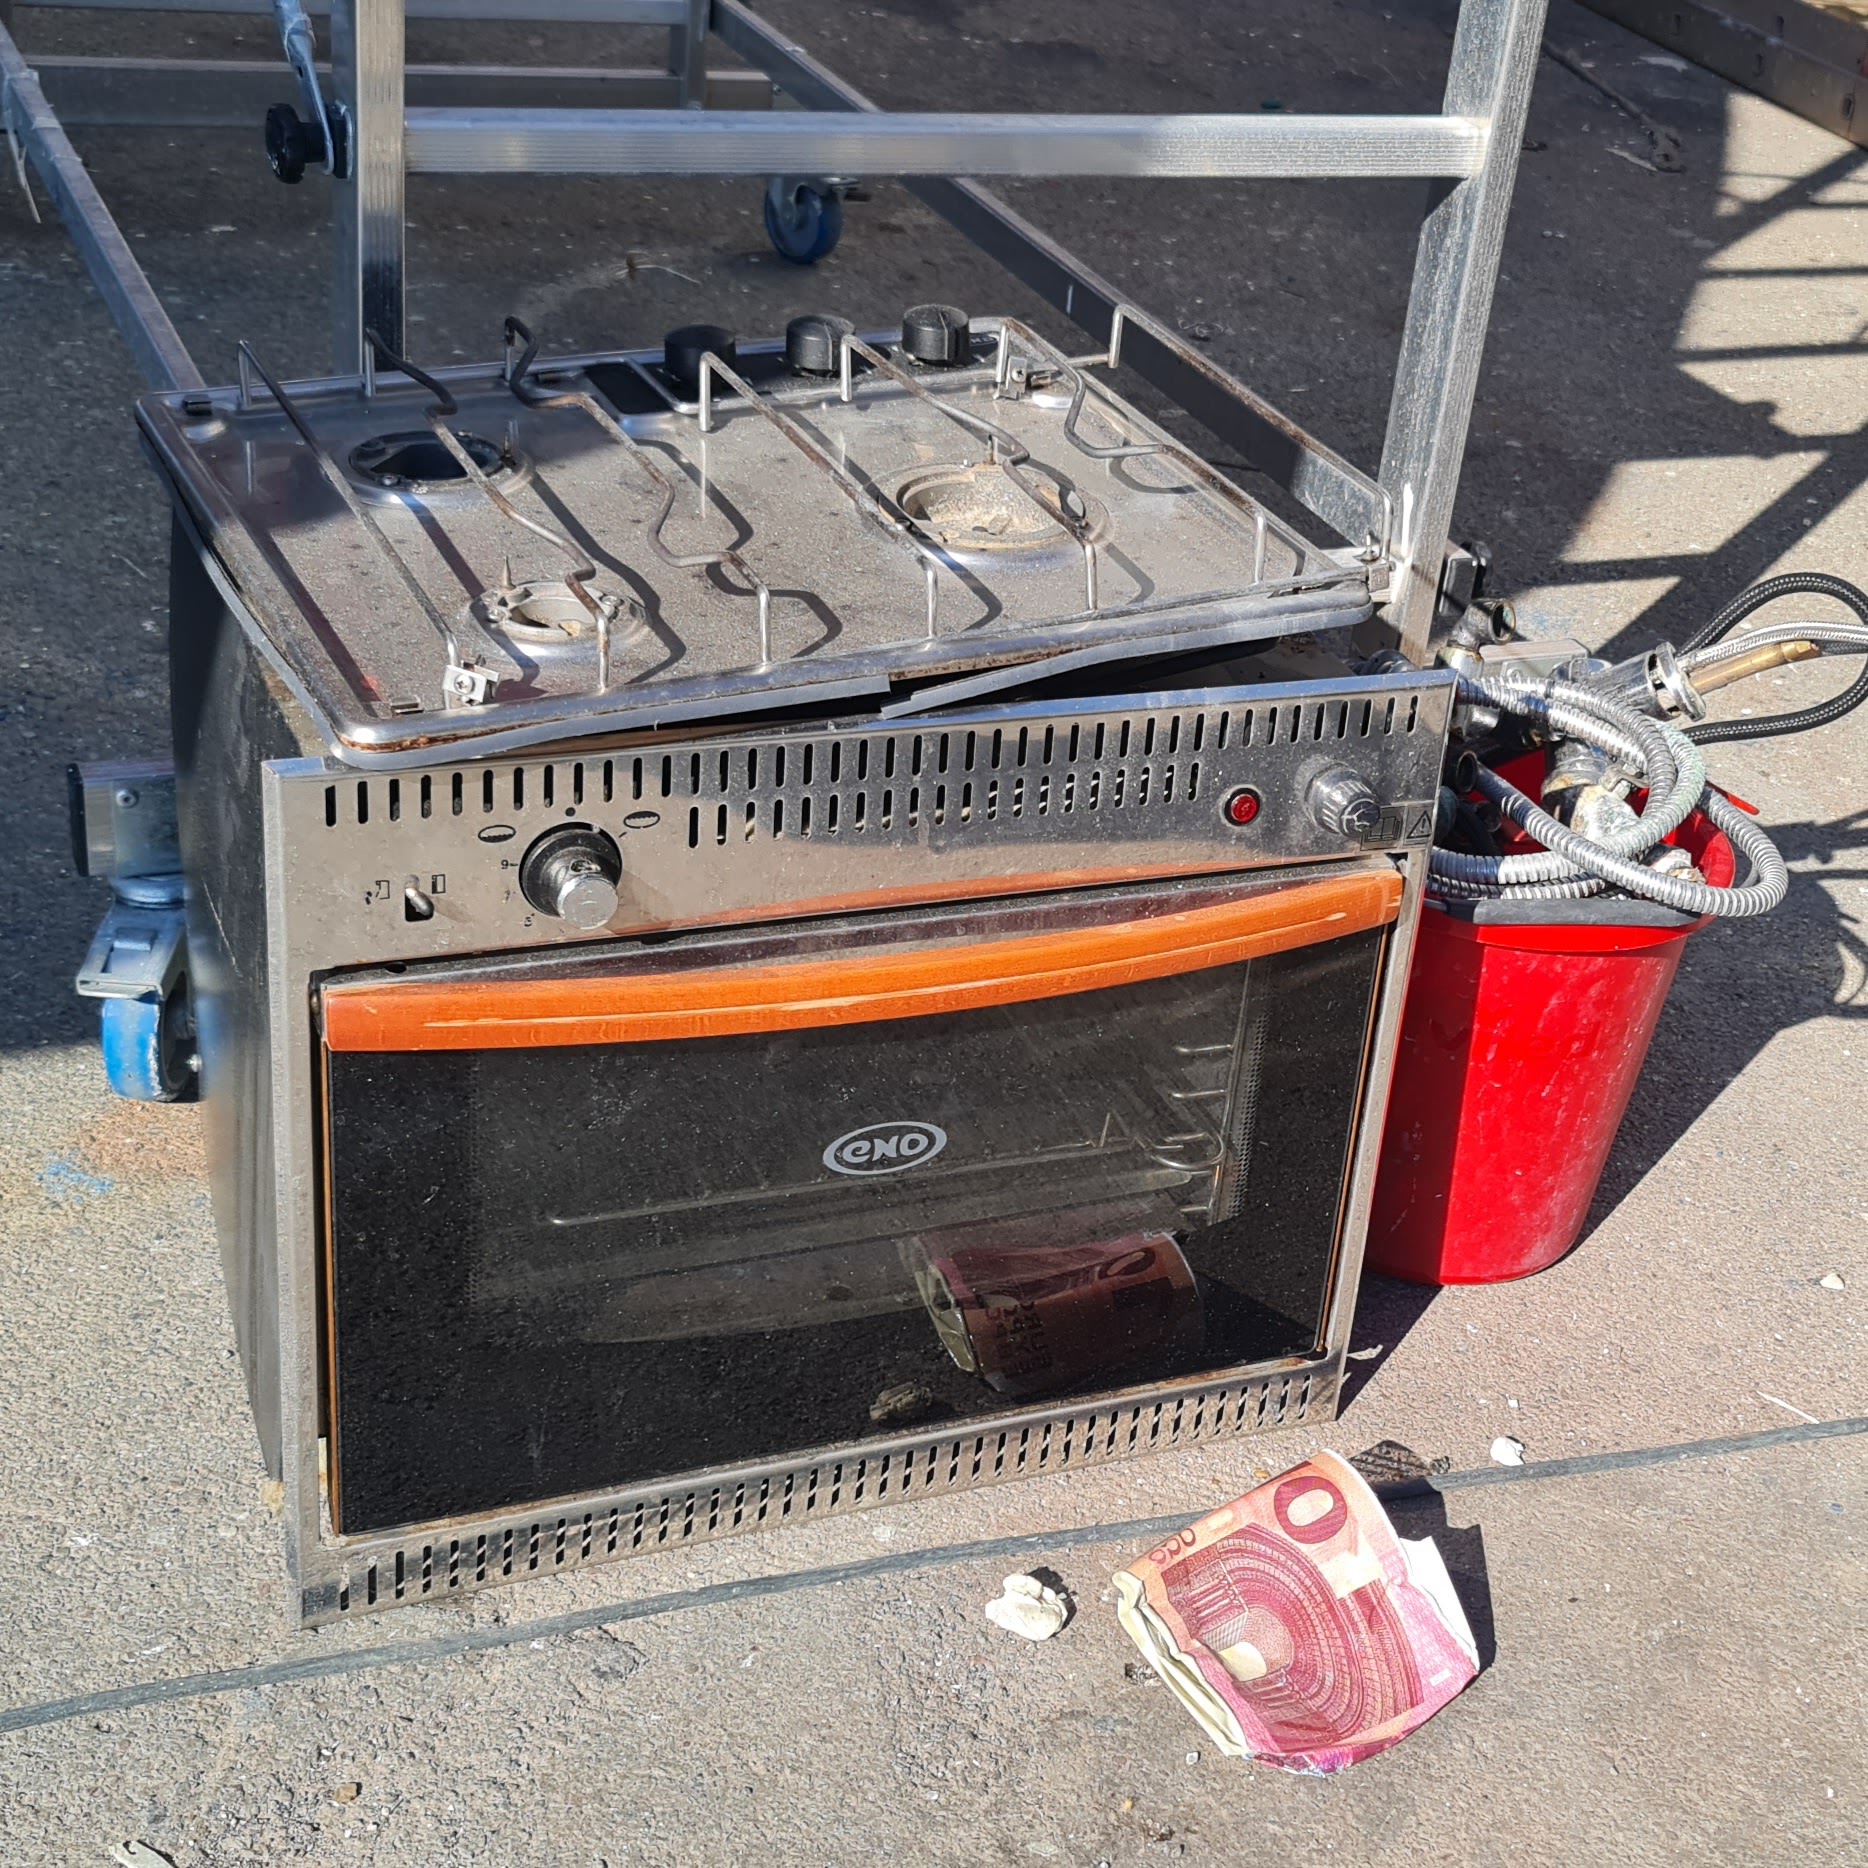
Guess what? We brought the old ENO oven and the matching cooking table down first.
After 10 years, not only was it hard to clean up to shinning standards, but the oven piezo wasn’t working, and the grill function was erratic.
The original microwave oven was equally replaced in the process.
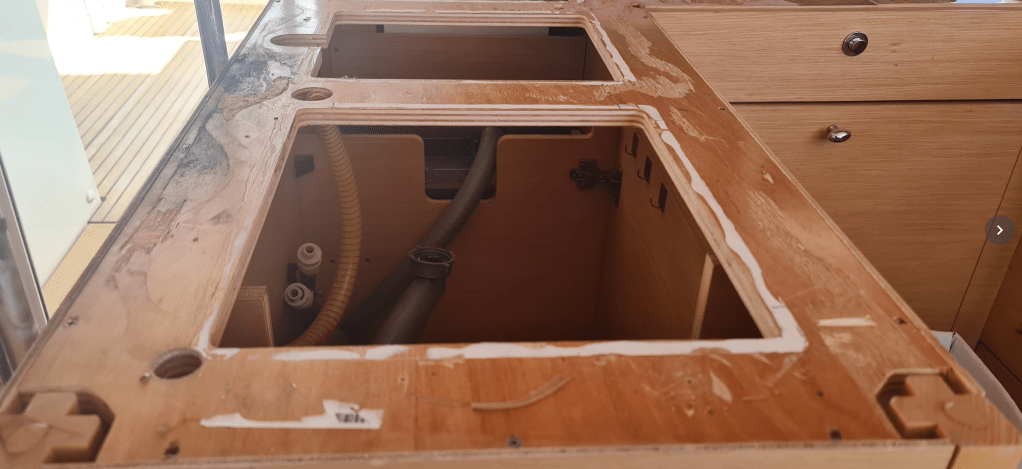
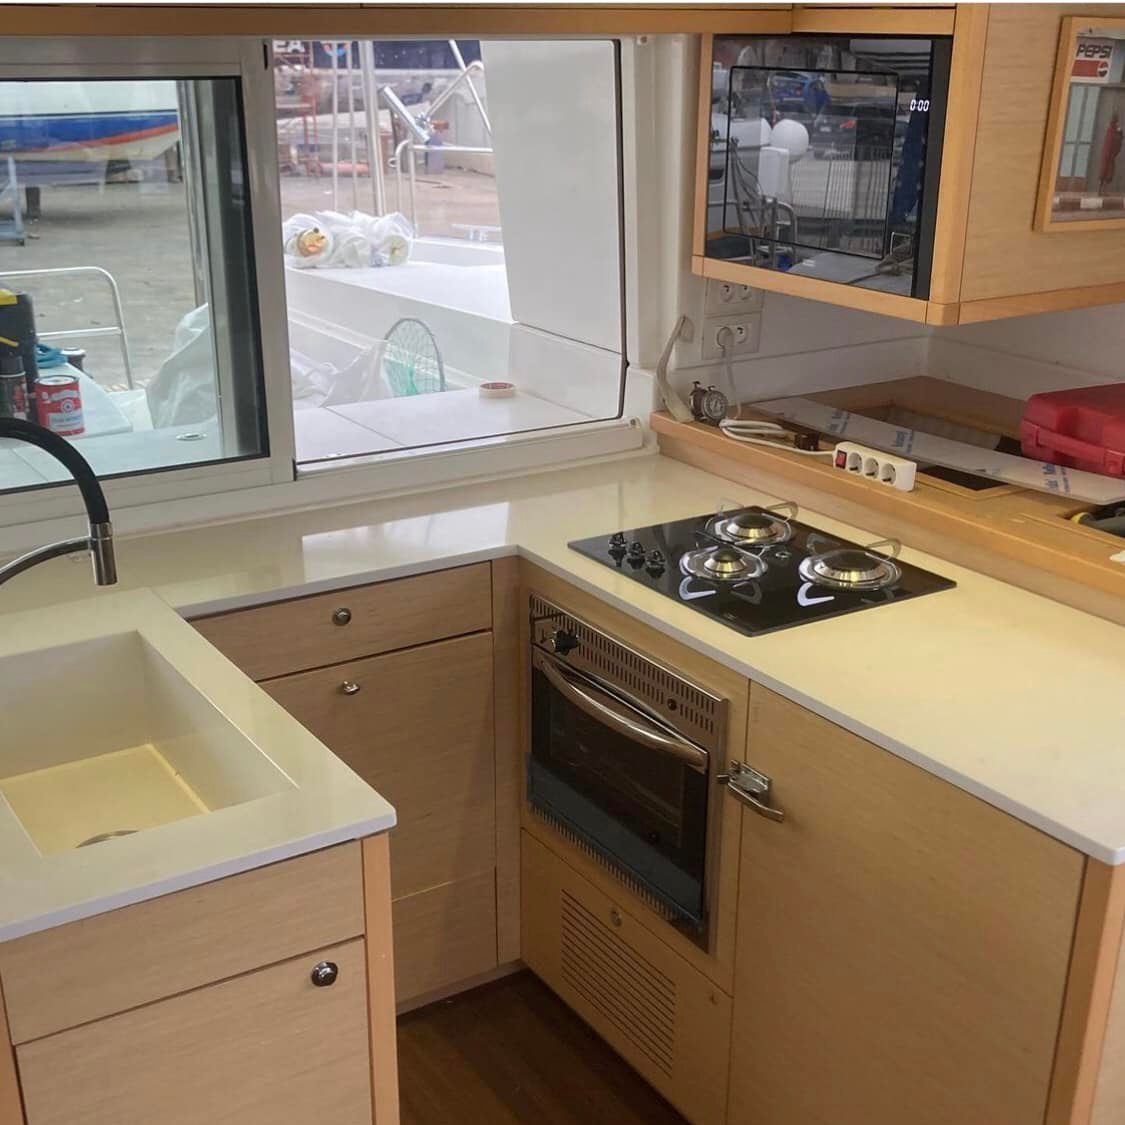
Then we dismounted the corian top, the 3 small sinks and the aged taps and soap dispenser. The new owner wanted one large sink, which is indeed a more practical solution than the original three little sinks Lagoon had fitted there.
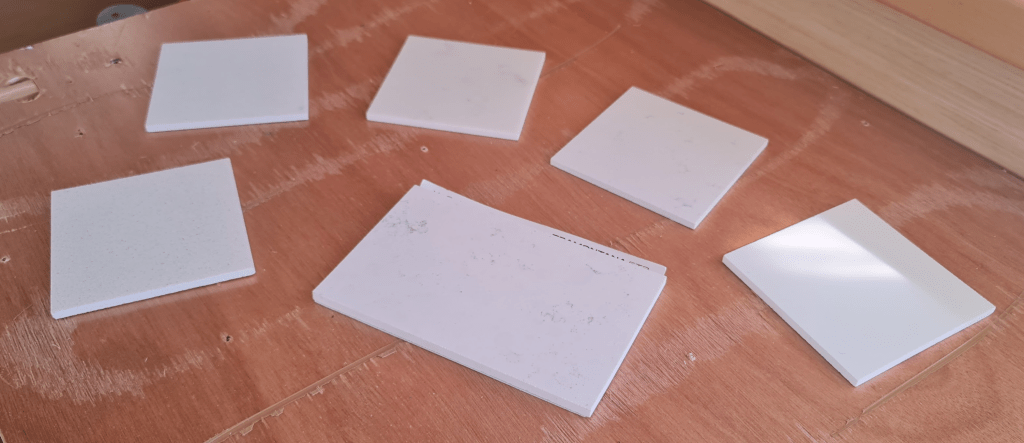
The owners could chose between different material and color for the new countertop. They do seem all alike on the photo, but we did spend quite some time to pick the one that would make them feel at home.
The material used is made locally in an epoxy-marble mix, both light and stain resistant. We think it’s better than Corian, and also cheaper, as it doesn’t use bauxite. Don’t hesitate to contact us if you are inspired to change yours – we ship globally.
Elia di Prima
The result is amazing. It is both more convenient, with more cooktop space, and beautiful. The new owners decided against all-around fiddles, a personal choice which will surely be abundantly discussed. Well, it is a catamaran after all, meaning it doesn’t heel and is more stable, even if cooking in rough seas will surely require some kind of protection.
Of course the faucet, the soap dispenser and the polycarbonate protection were changed, for a very sleek finish. Under the instruction of the new owners, we ditched the manual pump which could get sea or tank water from a foot pedal operation, increasing furthermore the clutterless impression.
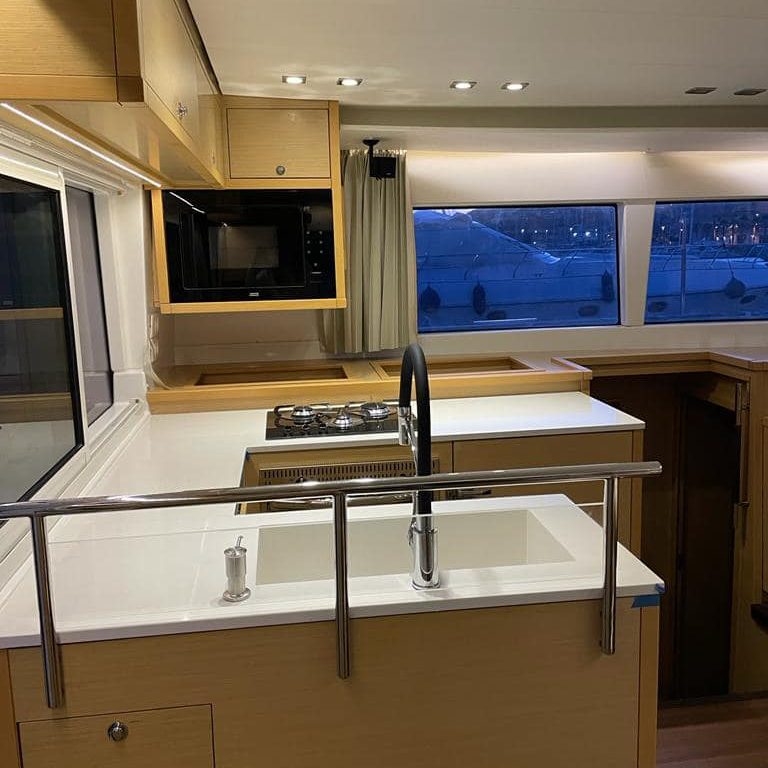
This project is a great success, which really transforms the look & feel of this boat. A real motivation for a good Sicilian meal among sailing friends !
This has been a long-standing debate among our clients and partners.
I once talked to this client who had applied the hull bottom paint to their propeller, no primer, no resin to prevent galvanic reaction. The paint cover went off in a blast after very little time. And after many tries over time, we had to conclude that there was no cheap and effective antifouling solution giving decent results on propellers. The key point is that regular bottom paint tends to wear quickly on a propeller, due to increased water friction.
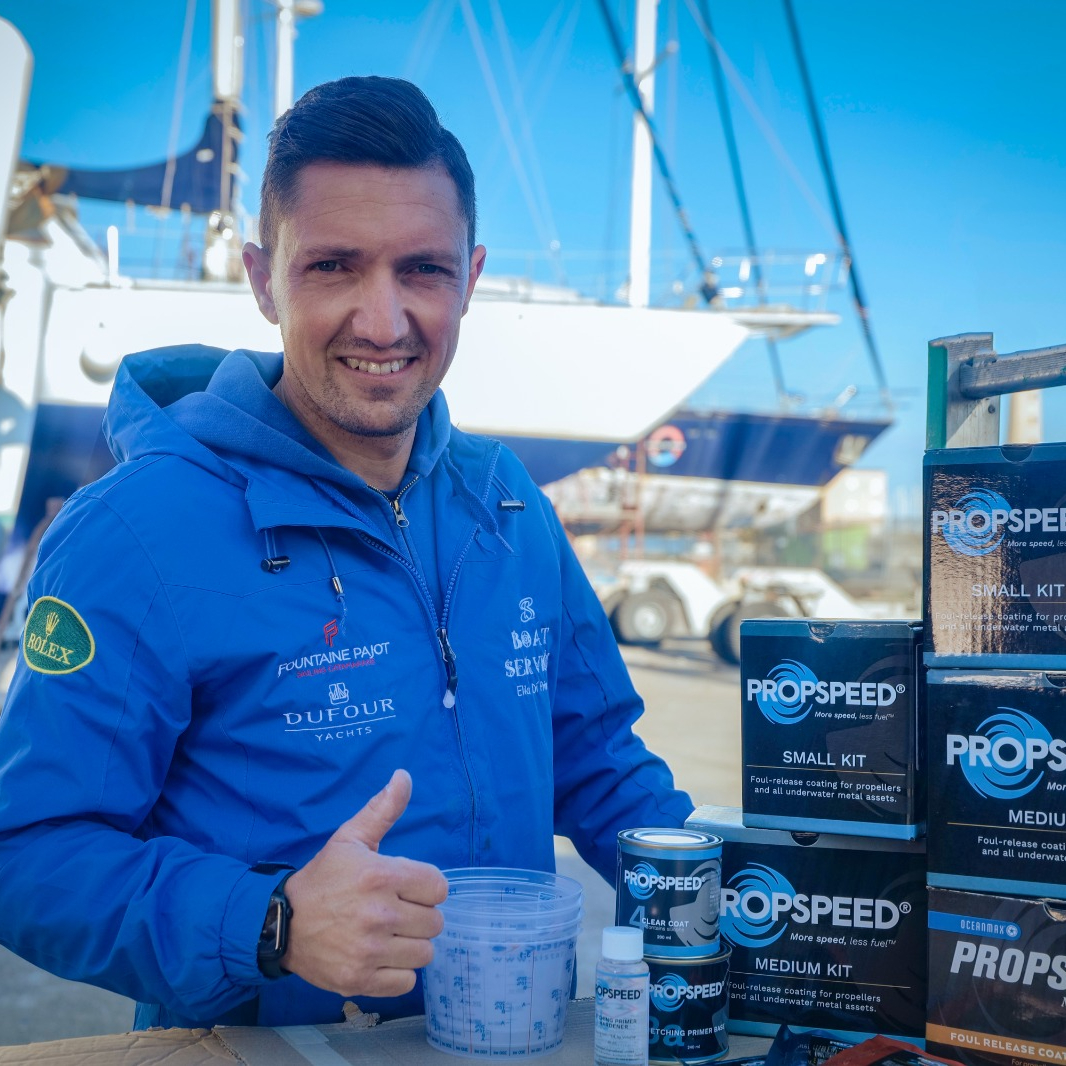
This is when we came across PropSpeed at a boat show, a more expensive solution, but also both more durable and efficient. One thing we particularly liked about it is that you didn’t have to re-start the whole process to repair a small damage. These can be locally sanded, clean and reapplied with PropSpeed solution (trying not to overlap, though).
PropSpeed discourage amateur application, and we went through their special training course to become qualified with their solution. One reason for this is that the coating process requires special process and care, and would usually involve two persons, as the time between yellow primer and Clear coat application is of the essence.
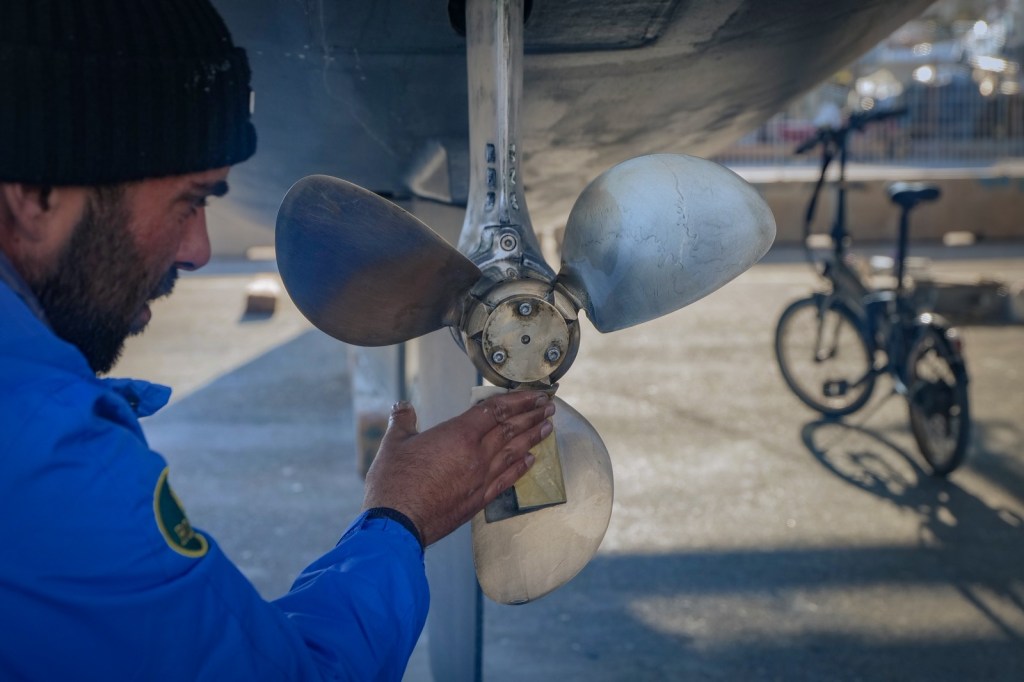
This is Daniele making a last sanding pass on the shining propeller of a Lagoon 450F.
Folding props are very delicate to work on and require special attention. Three-bladed prop needs to be completely removed to replace the sail drive anode. The assembly usually consists of 16 pieces, plus 1 saildrive anode, 2 bolts, 3 segmented hub anodes, and 3 Allen bolts. We mark each blade and hinge pin so that they are returned to their exact same spot.
Elia di Prima
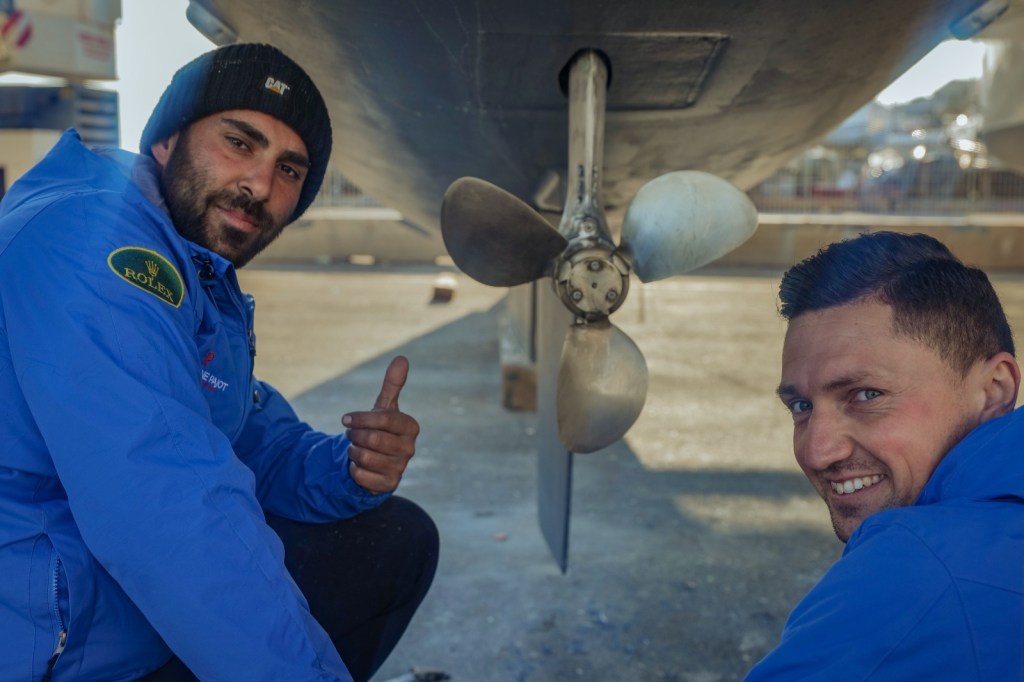
There are some ungrateful boat work, hard, invisible to most. But working on a beautiful three-bladed folding bronze propeller, to bring it back to its mint condition isn’t one of them. We’re obviously both very proud of the result here.
And then PropSpeed Primer and Coat are applied. No time for process photos there, as we need to work fast through these two steps (see the vendor’s specifications bellow).
Of course we apply the coating according to the vendor’s specifications, and we went through their training course to get the qualification. Check it out here.
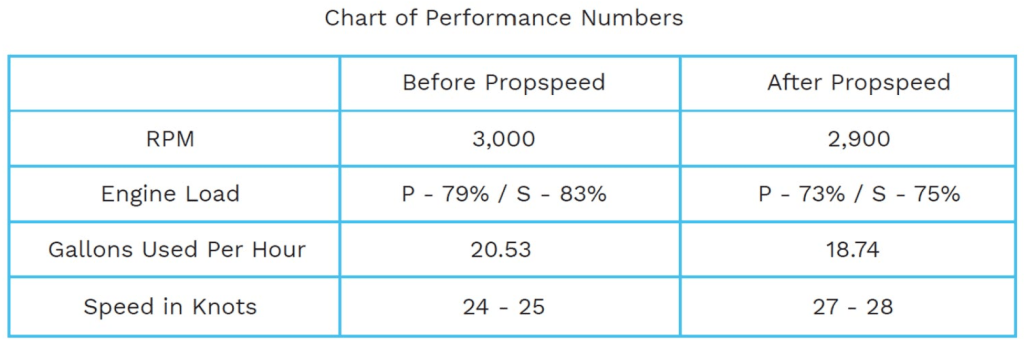
It is a pricey solution, but owners tells us it pays for itself pretty quickly into the sailing season, keeping the engine performance and fuel consumption at their nominal for extended time — and boy, did this become important with the fuel prices these days!
We can only trust their judgement here, and share with you the maker’s analysis. This performance chart is published on PropSpeed’s website as the testimonial of the owner of a Sea Ray 470 Sundancer.
Of course we know there are no such things as “independent studies”. However, we are in a prime position to observe in what condition we get the propelling systems when the boats are hauled out for bottom cleaning and coating with antifouling.
I don’t usually endorse one product against another, and I’m always happy to share with other sailors what are their best experience. That’s how we improve things in the long run. Regarding PropSpeed, I must say I’m ready to commit a little more 🙂
With the fuel prices reaching sky-high levels these days, why don’t you contact me to discuss your projects?
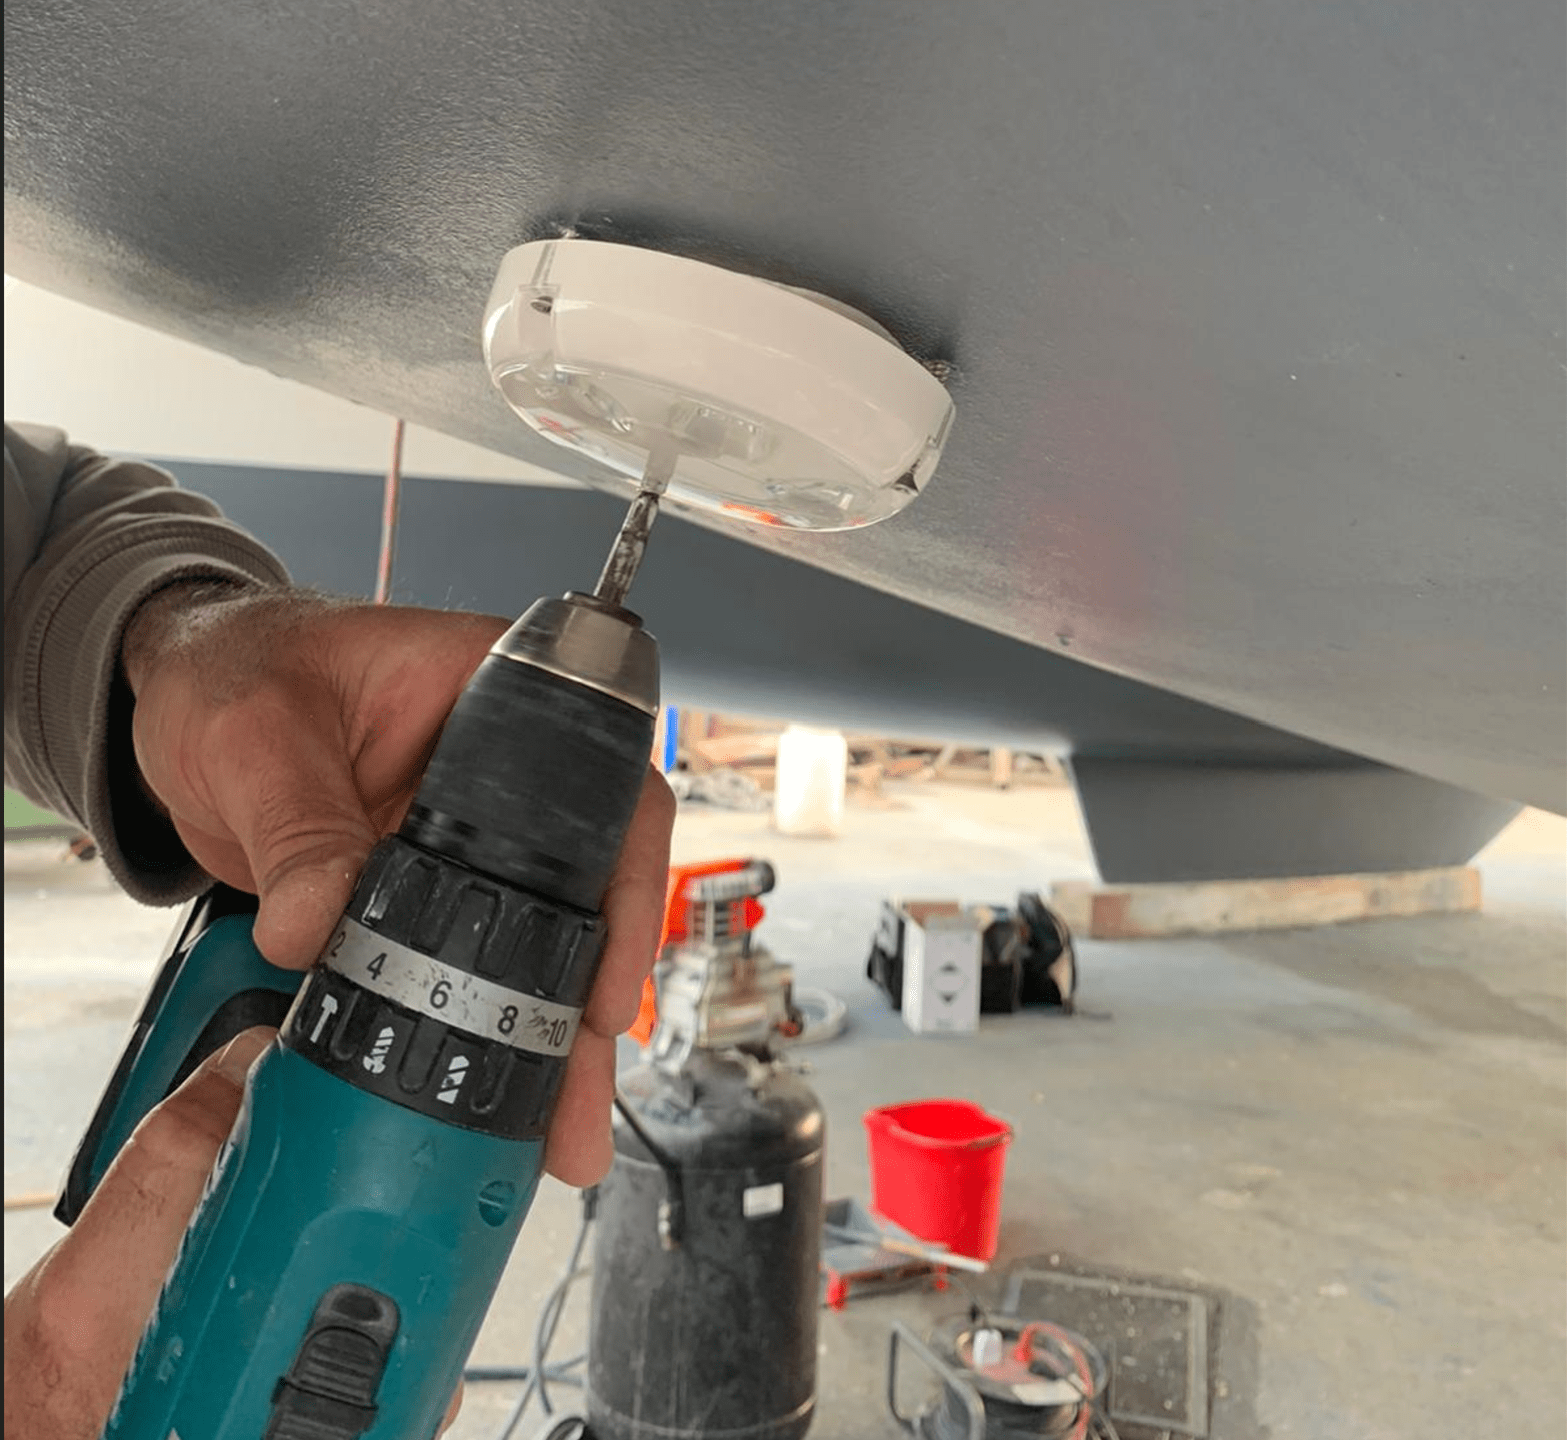
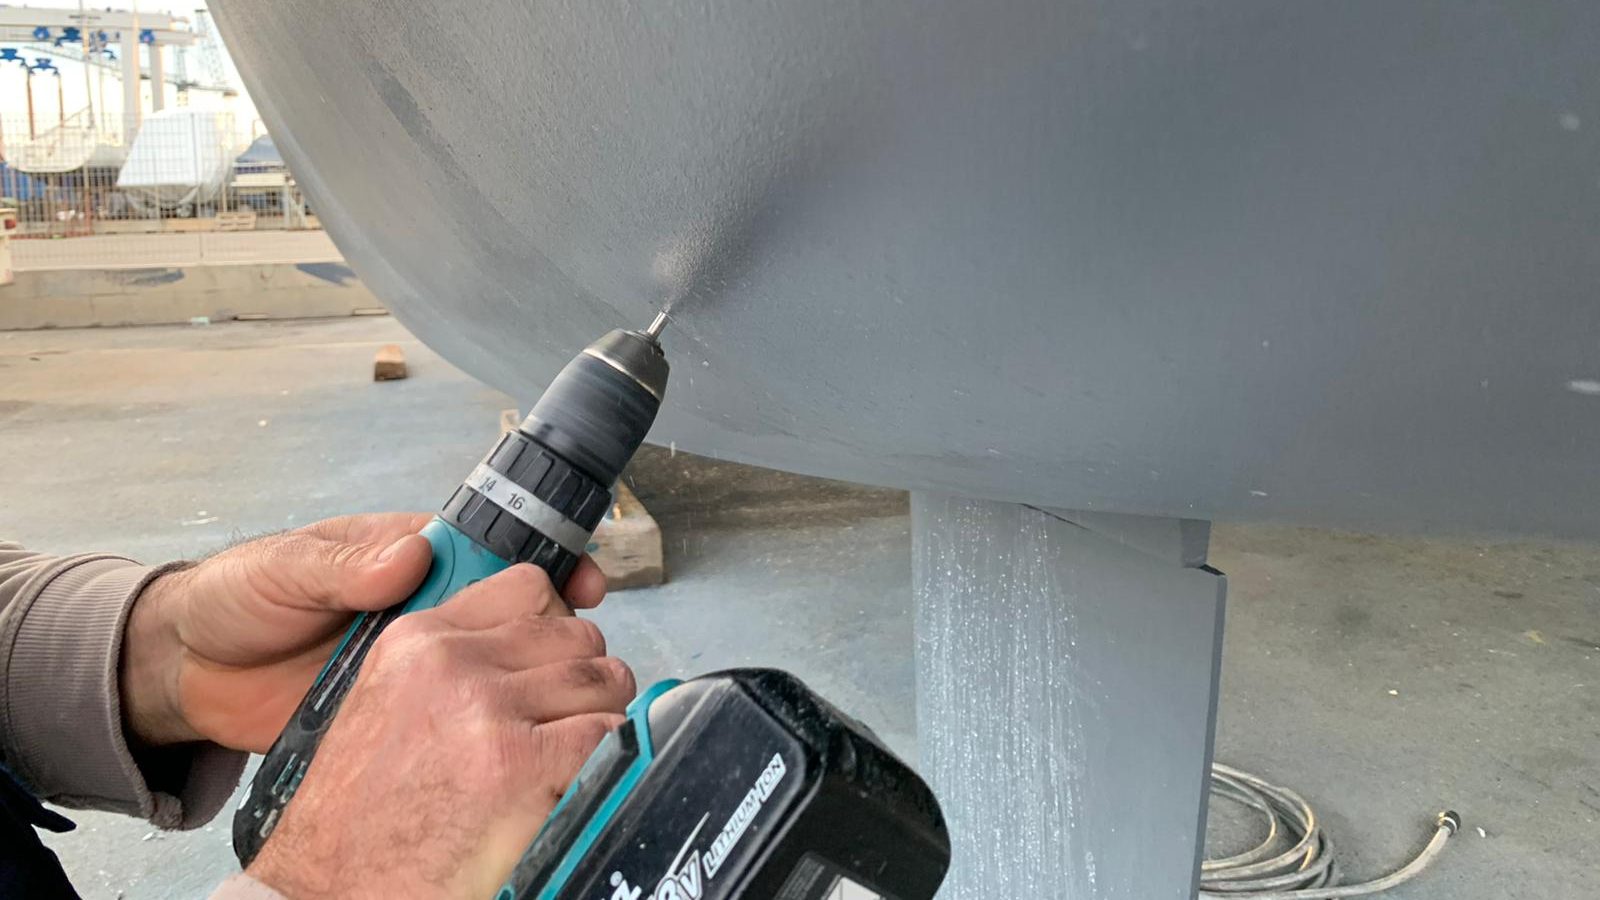
This Lagoon 450F changed owners last month, and quite a lot of improvements and changes were made by its new owners. This project was about adding underwater lights at the back of both hulls.
Everyone has different views on the pro and cons of underwater lights. We can share here a few which comes to our mind.
Pros
Looks good: whatever the color, underwater lit boats always stand out while moored or anchored. If you like the attention, that’s one sure way to get it.
Docking safety: Mediterranean docking by night (meaning moving backward to the dock) is always a challenge. Lights will improve visibility on other boats, their forward lines etc, and make it easier to measure the distances.
Fishing: If you want small bait (shrimps, planktons) to surround your boat, lights are must-haves. They will attract fish. Best color for this will be green or white.
Swimming: If you want to go for a night swim, nothing beats the comfort of seing were you’re diving. Aside from safety, it also helps to appreciate underwater scenery.
Cons
New holes: This is always an issue, especially for modern boats with already quite a large number of tru-hull. These holes needs to be made with caution, to insure no water will leak inside.
Costly: Like most boat equipment, high-quality lights are expensive.
Power hungry: Even with the LED technology, these additional lights will take their toll on the boat’s battery bank, especially for those high performing units (6W/12V per unit in our project).
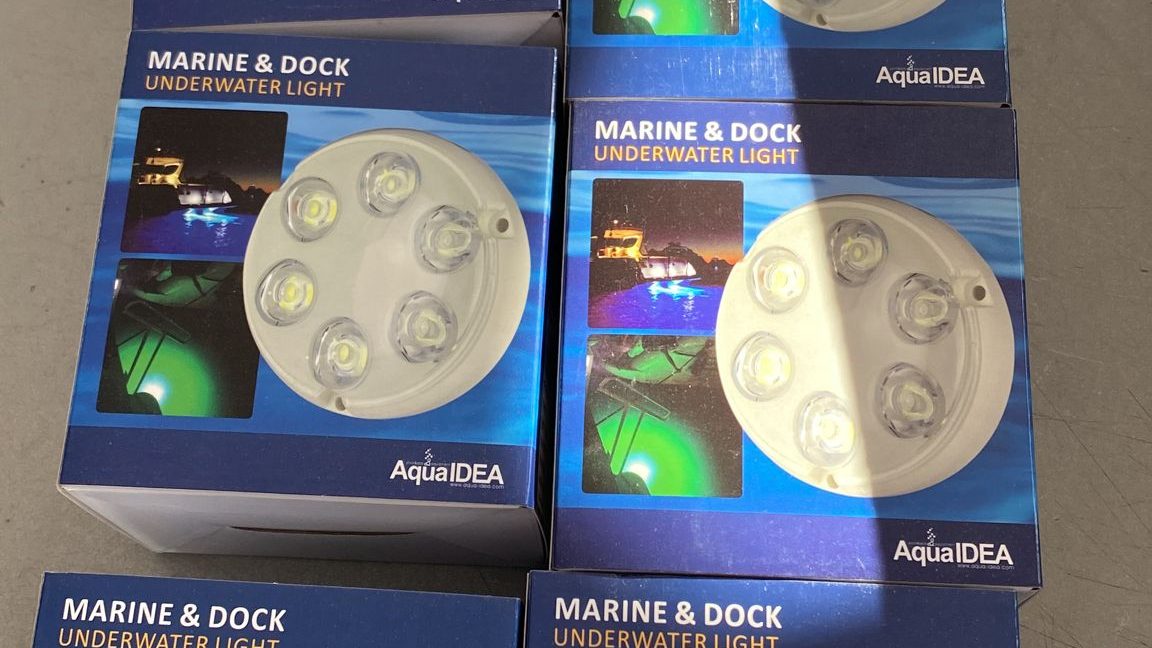
Anyway … this is not our call to make. Today, we’re here to install 3 lights per hull, B6W model, from the AquaIDEA range:
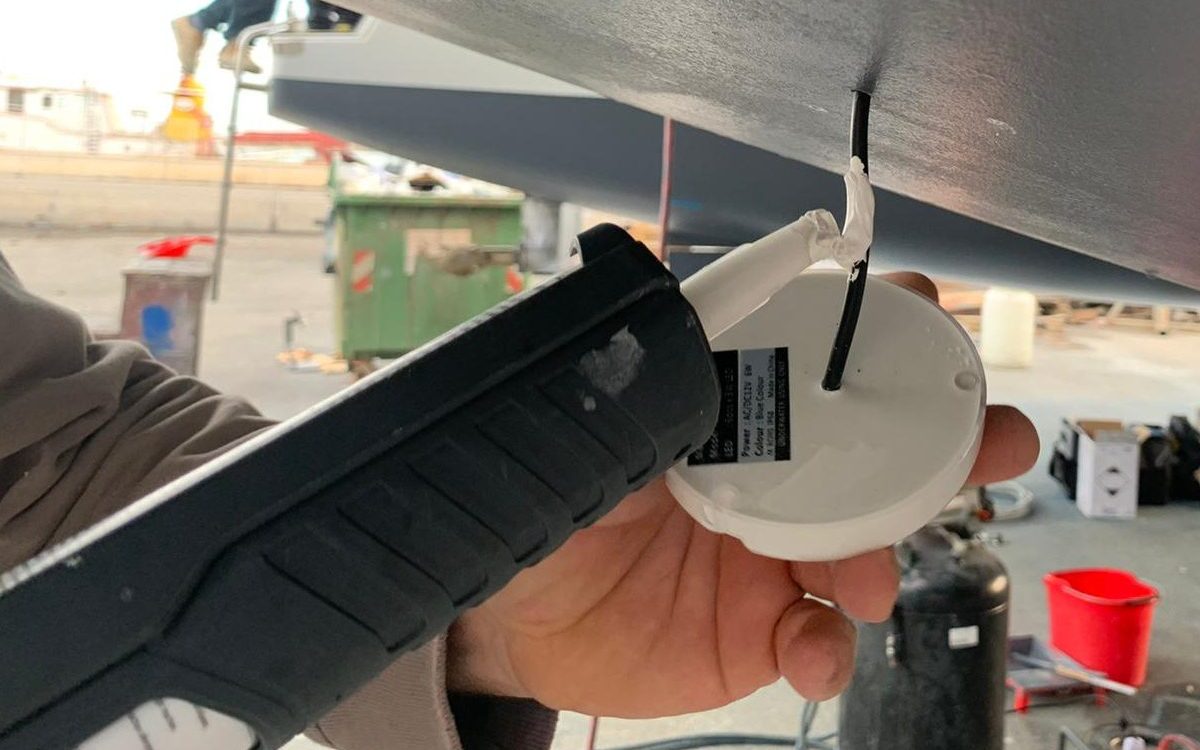
I guess it doesn’t feel natural at all to drill an additional hole in this hull (which had already quite a lot of tru-hulls of various nature), so we were very cautious here.
The electric connection is made inside the hull, greatly limiting the risk of leak
All in all, we installed three lights per hull.
We plan to put her back in the water by mid-March, and then we will finish some work while docked in Marina Cala del Sole. Obviously we’ll do a real-life water illumination test then, and we will share it with you 🙂
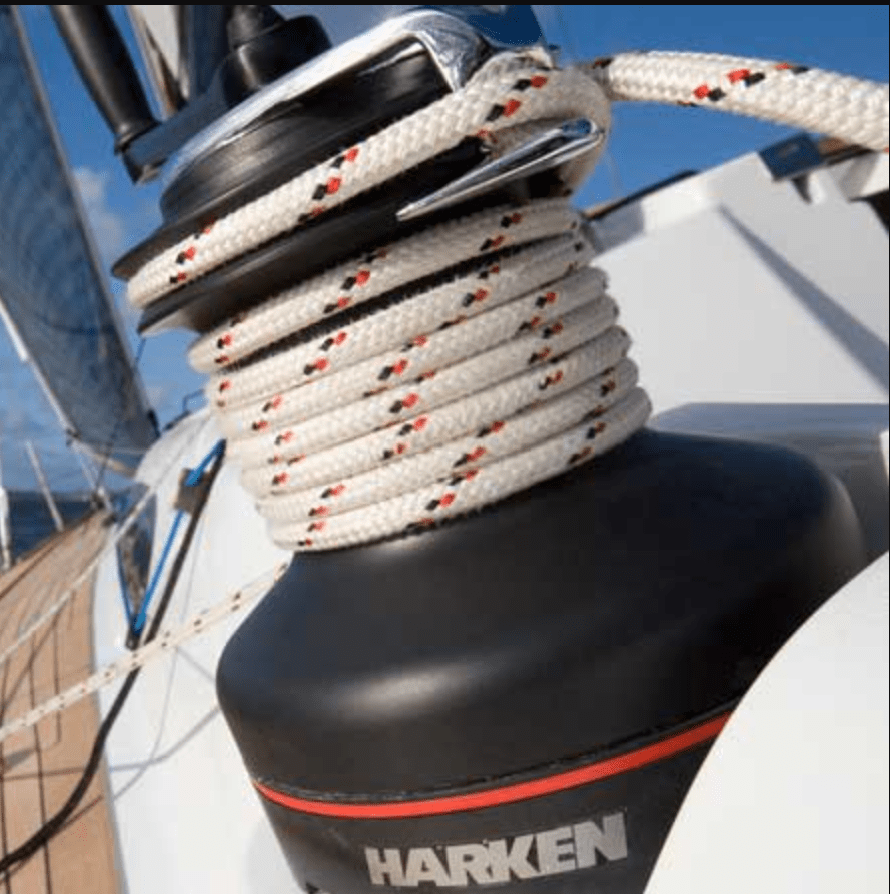
We were asked to do the maintenance on all winches on this Jeanneau Sun Odyssey 389. They are Harken self tailing 35.2 ST.
The process is simple
Dismantling a winch, degreasing, inspecting, lubricating and reassembling it is not difficult if you prepare, and are methodical.
Harken
While the guys at Harken would insist that this is a simple and clean procedure, we know for a fact that it can be quite intimidating to many owners, and that you do put your hands in the grease.
As a matter of fact, while some prefer to do this themselves, most are intimidated by the potential mistakes and small part losses. In this last case, they would usually try to help us and to learn in the process, putting us under great pressure.
Of course myself or every associate working on this topic has been trained, primarily using all the material provided by the vendor: And we carry a tablet with direct access to all the useful material provided online:
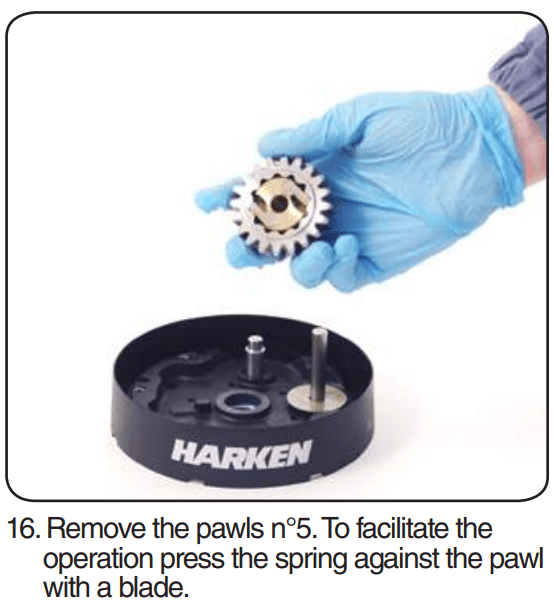
For those if us who don’t like reading manuals, let us help you with a useful extract of Harken’s procedure here.
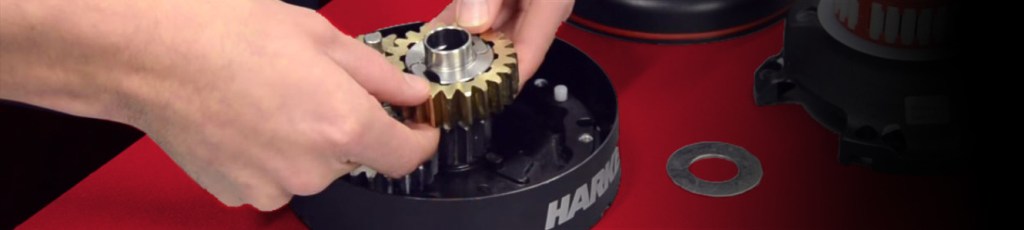
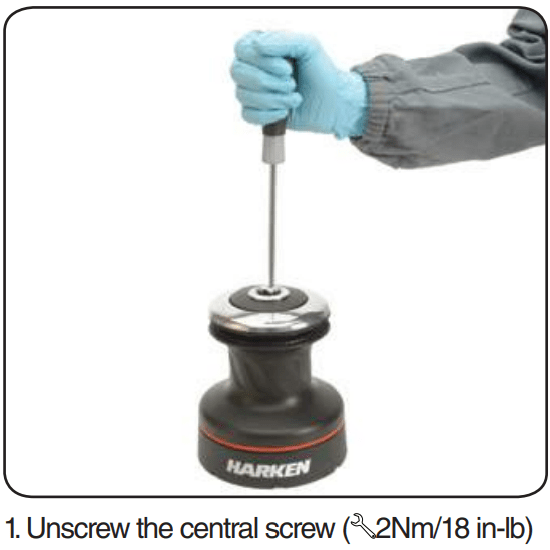
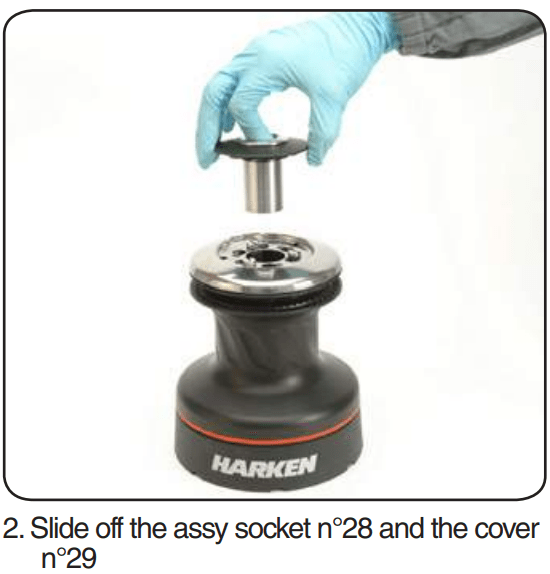
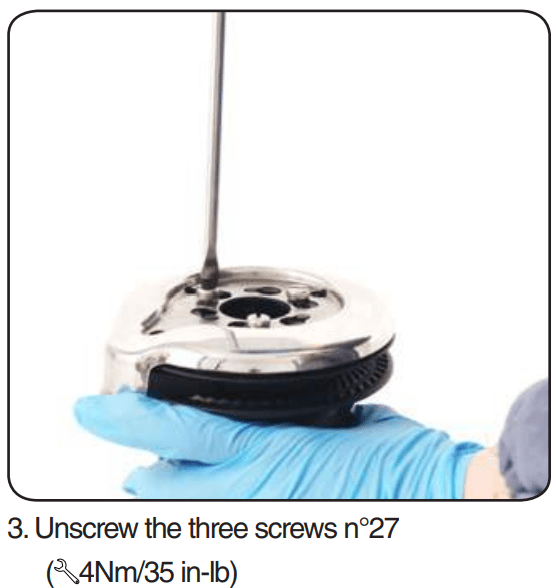
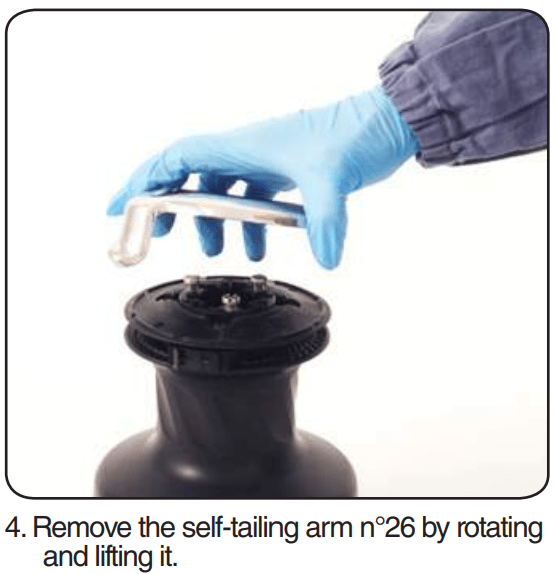
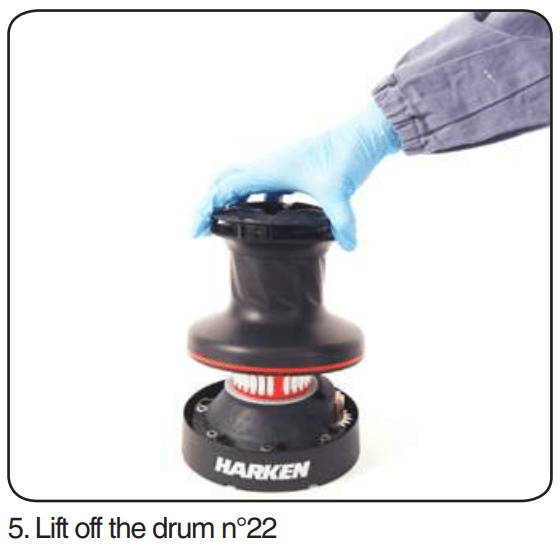
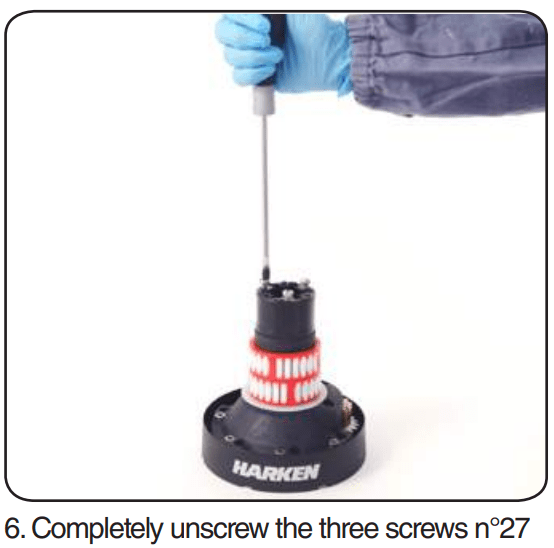
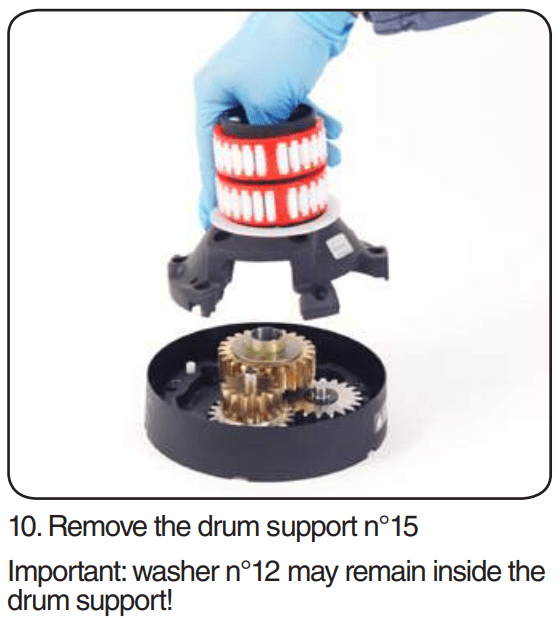
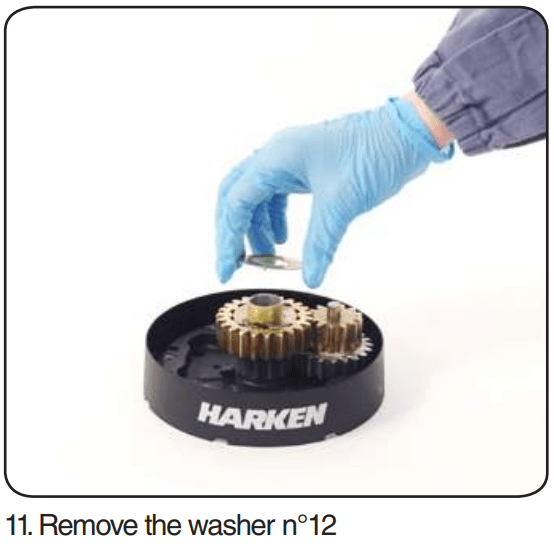
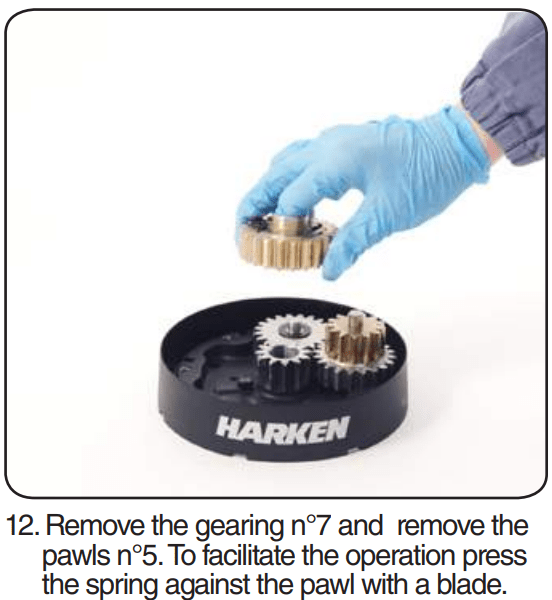
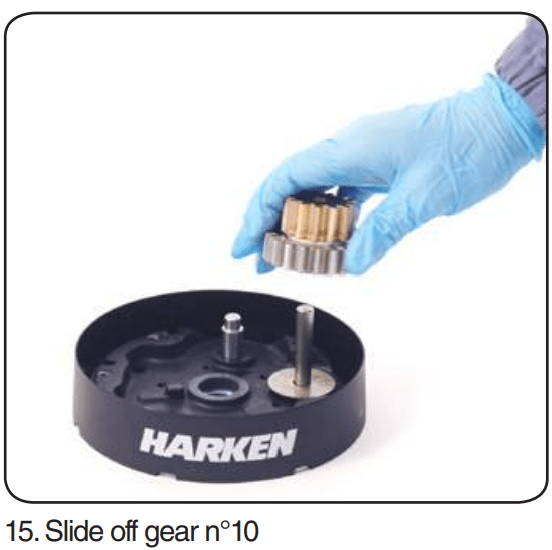
1. Removing the drum of the winch
2. Core disassembly procedure
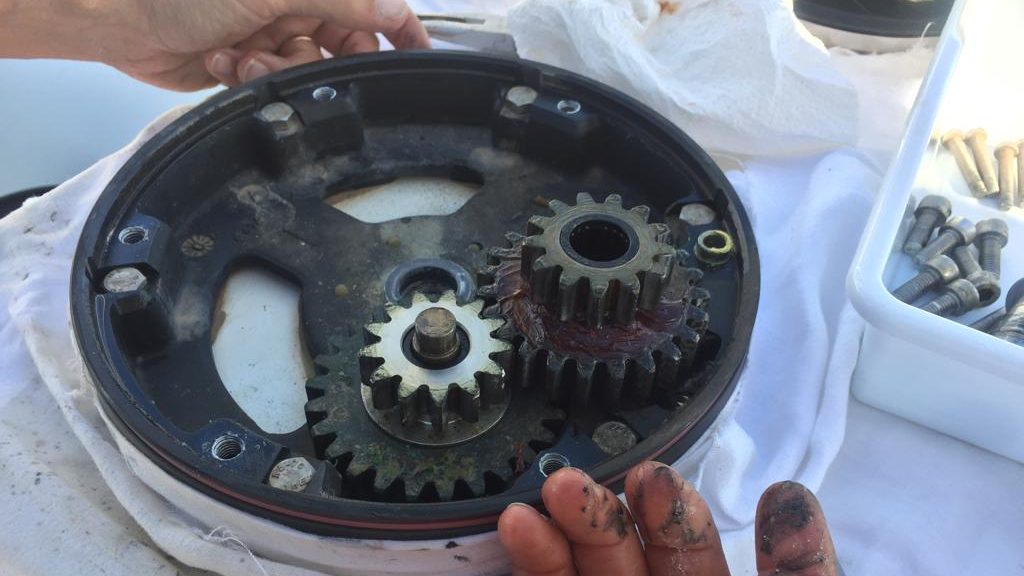
3. Removing the gearings
We would clean all the metal parts in petrol, wipe out the grease of all the plastic parts. In this case every part was in perfect condition, so we could re-assemble the winch straight ahead without using the spare kit the owners had for their Harken winches.
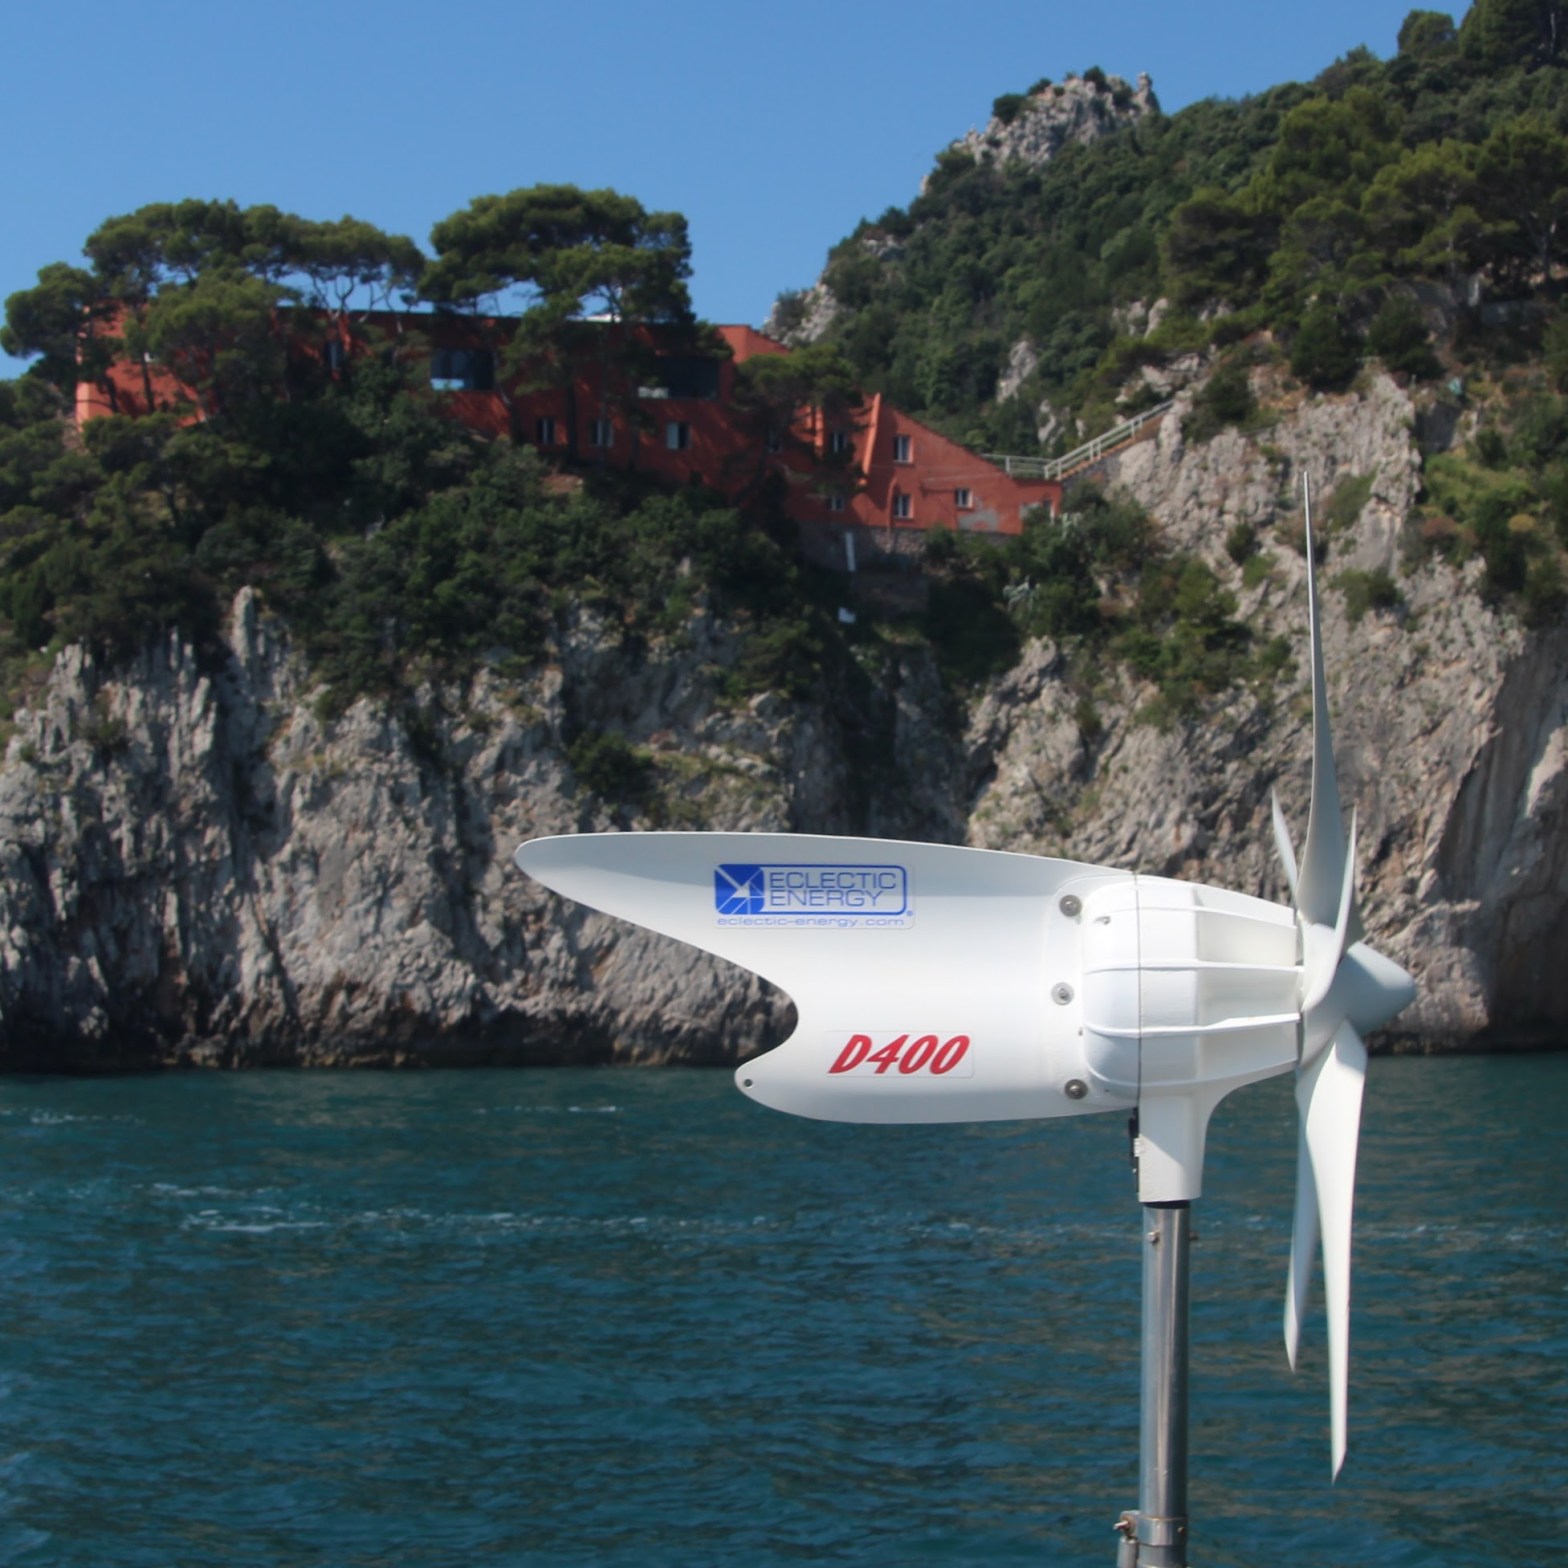
The owners of this Lagoon 450F catamaran came to us a couple of years ago with a very annoying issue. Despite a quite strong existing inox pole for their Eclectic Energy d400 wind generator, supported by 3 stainless steel legs, they encountered lots of vibrations. In fact, they told us that their guests, trying to sleep in the back cabin just beneath it, could barely remain polite about this issue 🙂
This unit is among the most popular, both for its high output and its reputation for silent operations, so it was indeed an installation concern which we were challenged to solve.
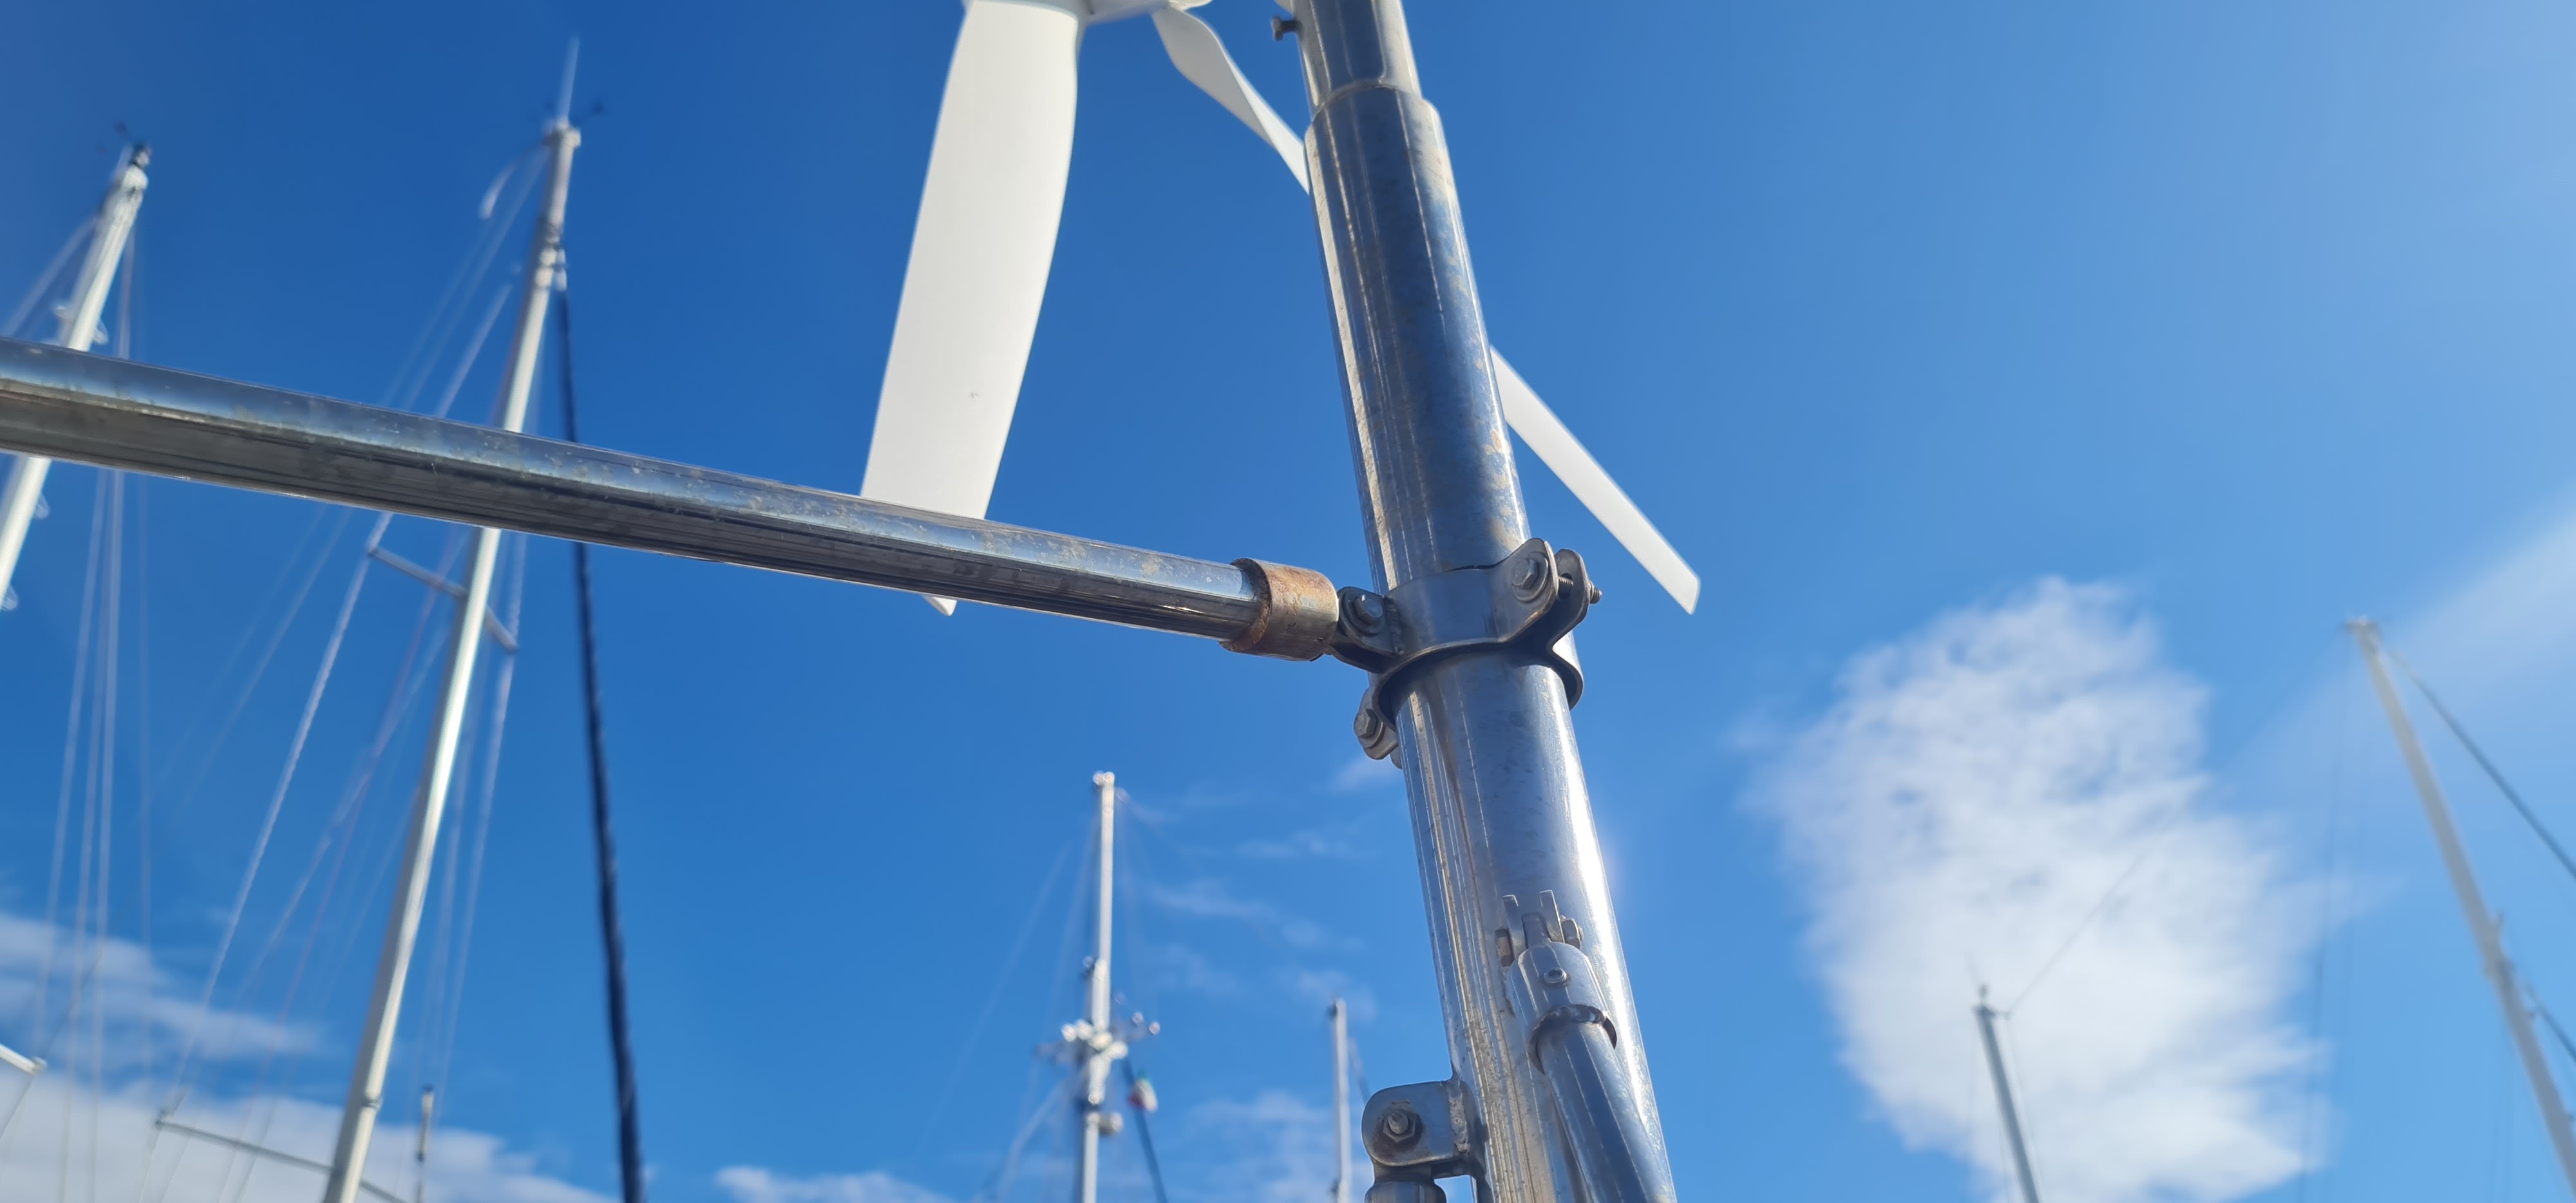
Given its location, completely at the back of the Port side hull, it seemed like a difficult task to improve the pole’s fixation. At first, we though about building a custom carbon-fiber support beneath the deck, to strengthen the three existing fixations arms. But before going into this direction, which would imply difficult and long under-deck work, our inox technician suggested we tried a smarter solution, by creating a 4rth fixation arm, nearly orthogonal to the 3 existing ones, and connected to Lagoon’s very strong roof-supporting angle inox pole.
3 photos to check it out.
Being installed over 2,2 m high, this new arm didn’t come at all in the way of the back circulation around the cockpit, and it did solve the vibration issues.
In fact, the owners were so happy about this smart solution — and not an expensive one — that a few weeks later, they sent us this photo of their d400 wind generator as they were passing by the famous Villa Malaparte, in Capri.
One of our clients for many years decided to sell their catamaran in Licata this February. And as we knew the boat inside out, Massimo, her new owner, entrusted us with quite an extensive refit project here in Licata, together with some of our longstanding partners.
All the jobs has to be completed rapidly, as the initial owner had only booked 4 weeks on the hard, and our work plan was quite packed for February and March. So we started this project two weeks ago, and we plan to finish it by mid-March.
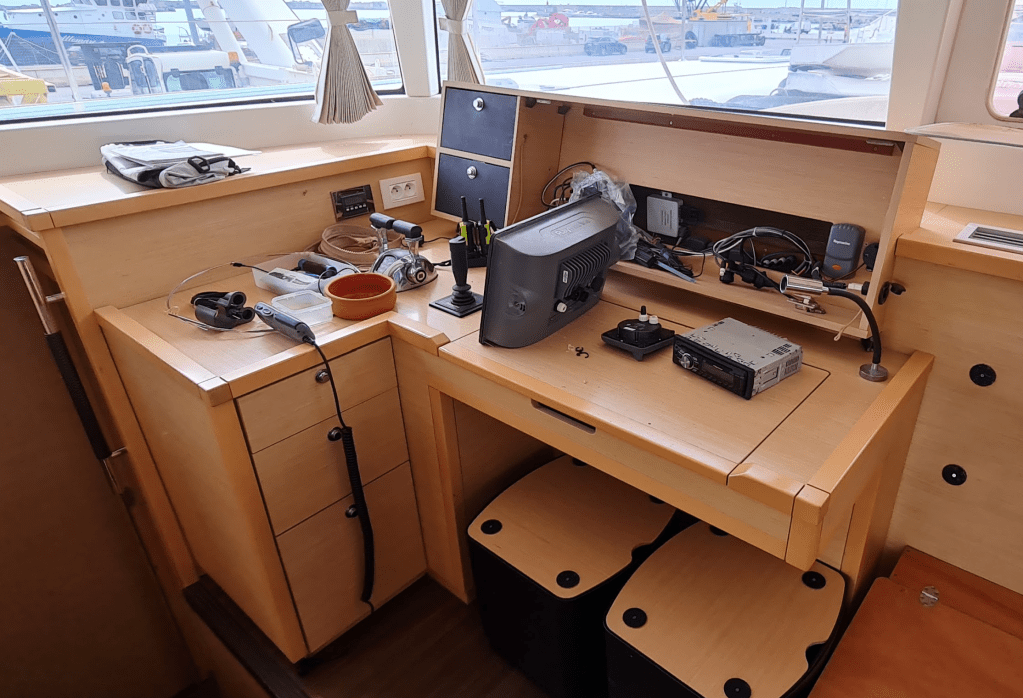
Electronics and electricity
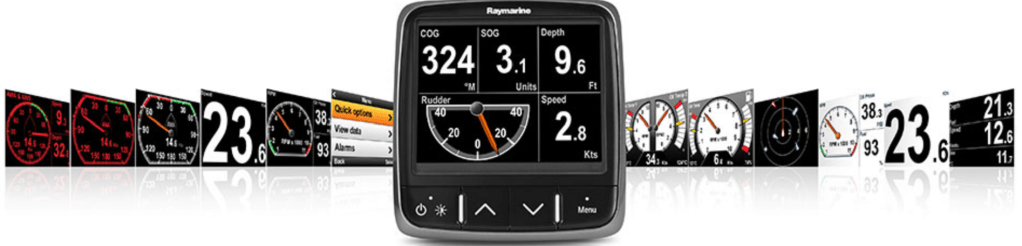
Our partner Giuseppe Vedda was called for all the electronic and electric work. Giuseppe had installed a new i70 Raymarine autopilot controller on this boat three years ago, and a Clipper BM-2 battery monitor two years ago. This time he will update all the legacy Raymarine systems. As you can see here, he has already started to pull apart the old system.
This is an on-going project, and we’ll share the final installation soon.
Upholstery
After 10 years, the very large number of outside cushions needed to be changed, This included fly bridge and roof cushions, and both front and back cockpit cushions. On such a catamaran, that’s a large surface of cushion! This is where Emanuele Corbo came in. Emanuele had already done some work on this boat over the years, including repairing the main sail easy bag, and he accepted to pospone on-going project to deal with this urgent one.
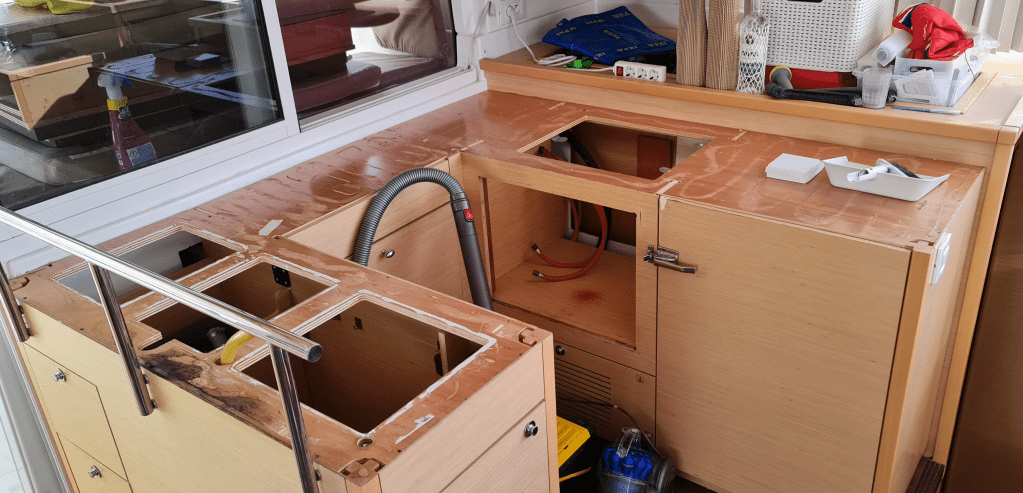
New galley
The initial owners have sailed over 27.000 nautical miles since the boat delivery, mainly in the Mediterranean, and the galley was showing some tear and wear due to this quite intensive use. This is why the new owner asked us to change the counter-top, the gaz appliances as well as the sinks and water taps.
This is an on-going project, and we’ll share the result soon.
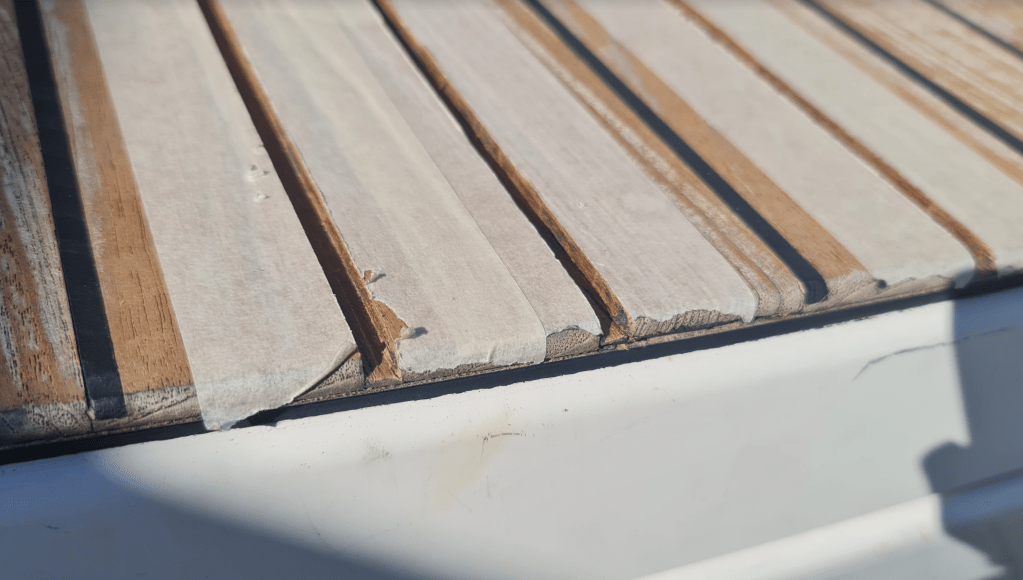
Teak renovation
The teak was in decent shape despite being 11 years old. So we gave it a light sanding, and planned to change some of the black seals.
Sails
The sails are original since boat delivery, in 2011. Needless to says, after 11 years and 27.000 miles, despite some regular repairs by the initial owners, they needed to be changed. The owners decided to bring them down, send them to a Palermo Sail Maker to have an exact Dacron copy made within 4 weeks.
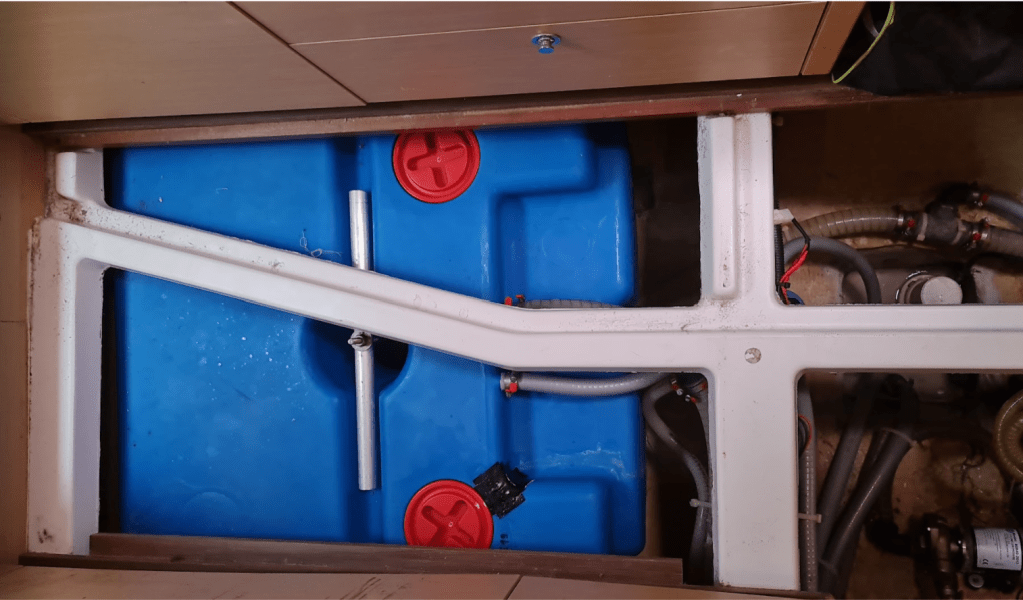
Tank operations (water & fuel)
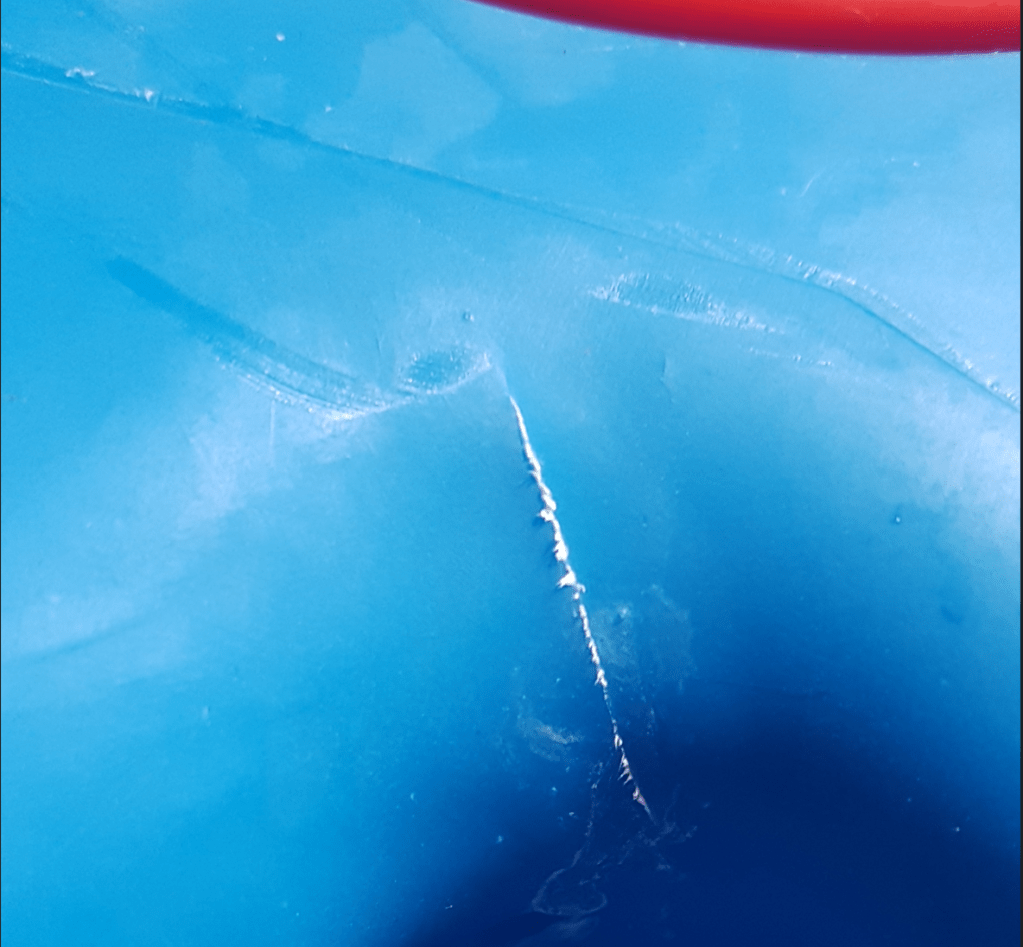
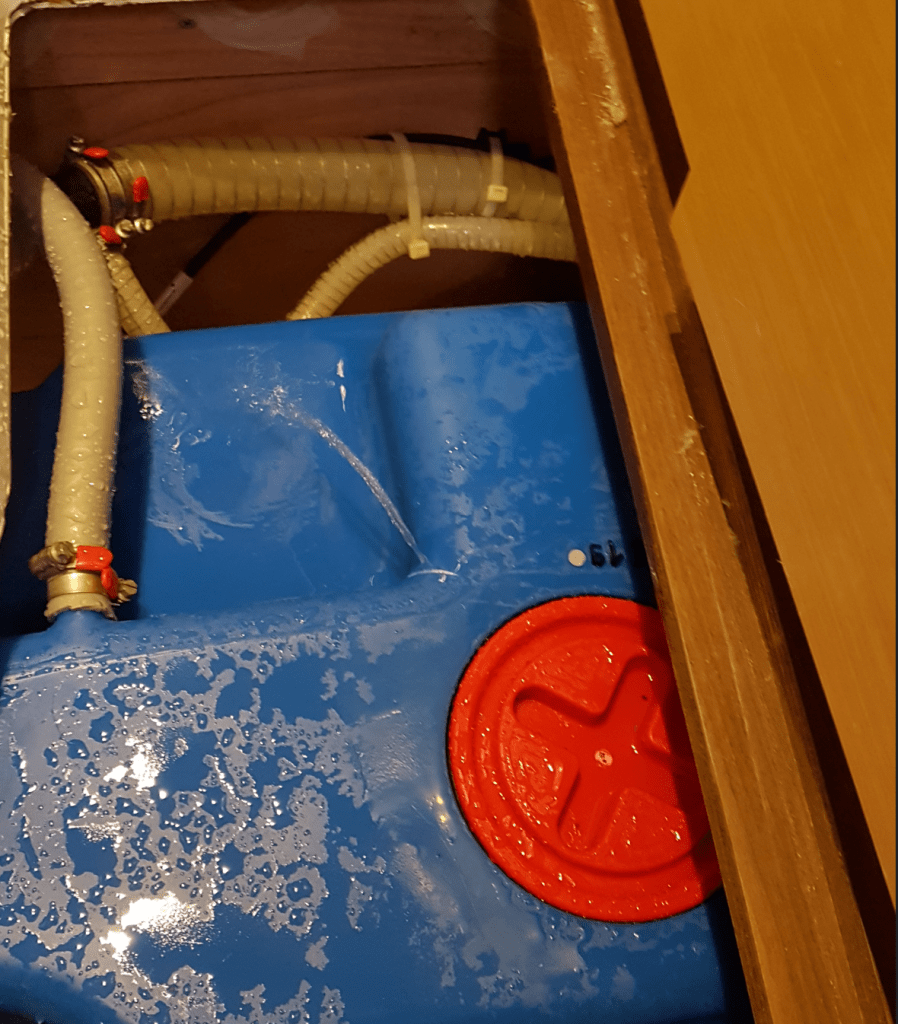
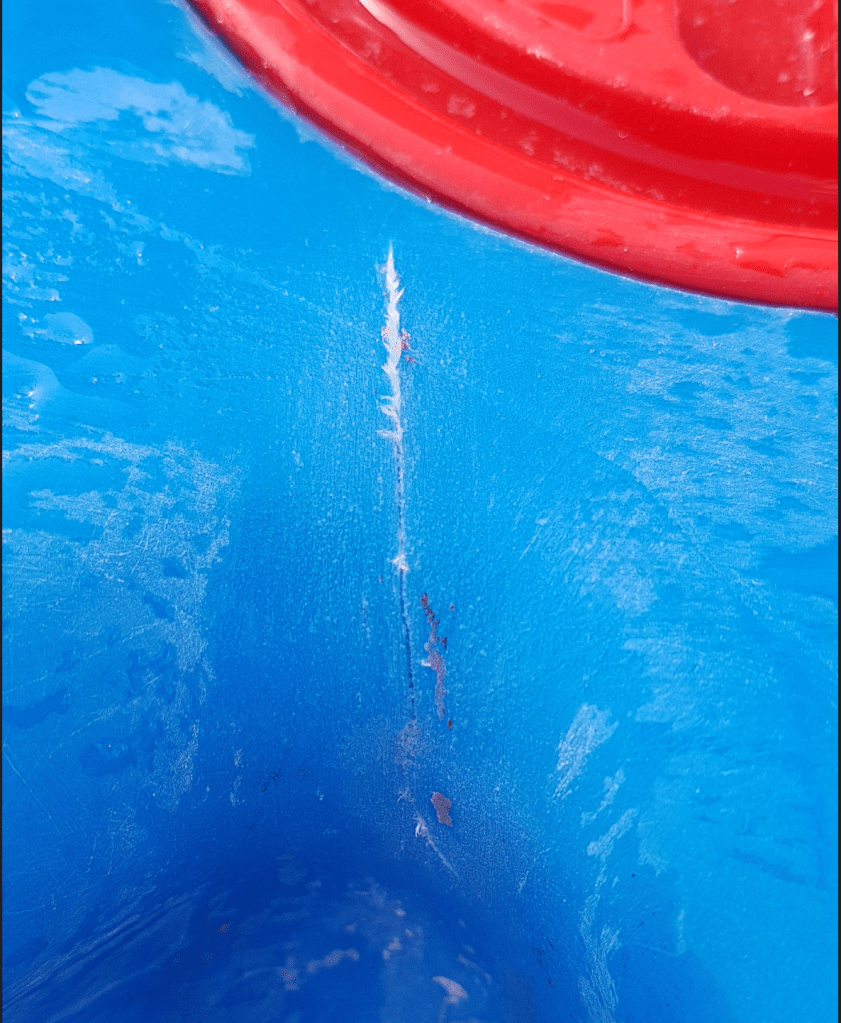
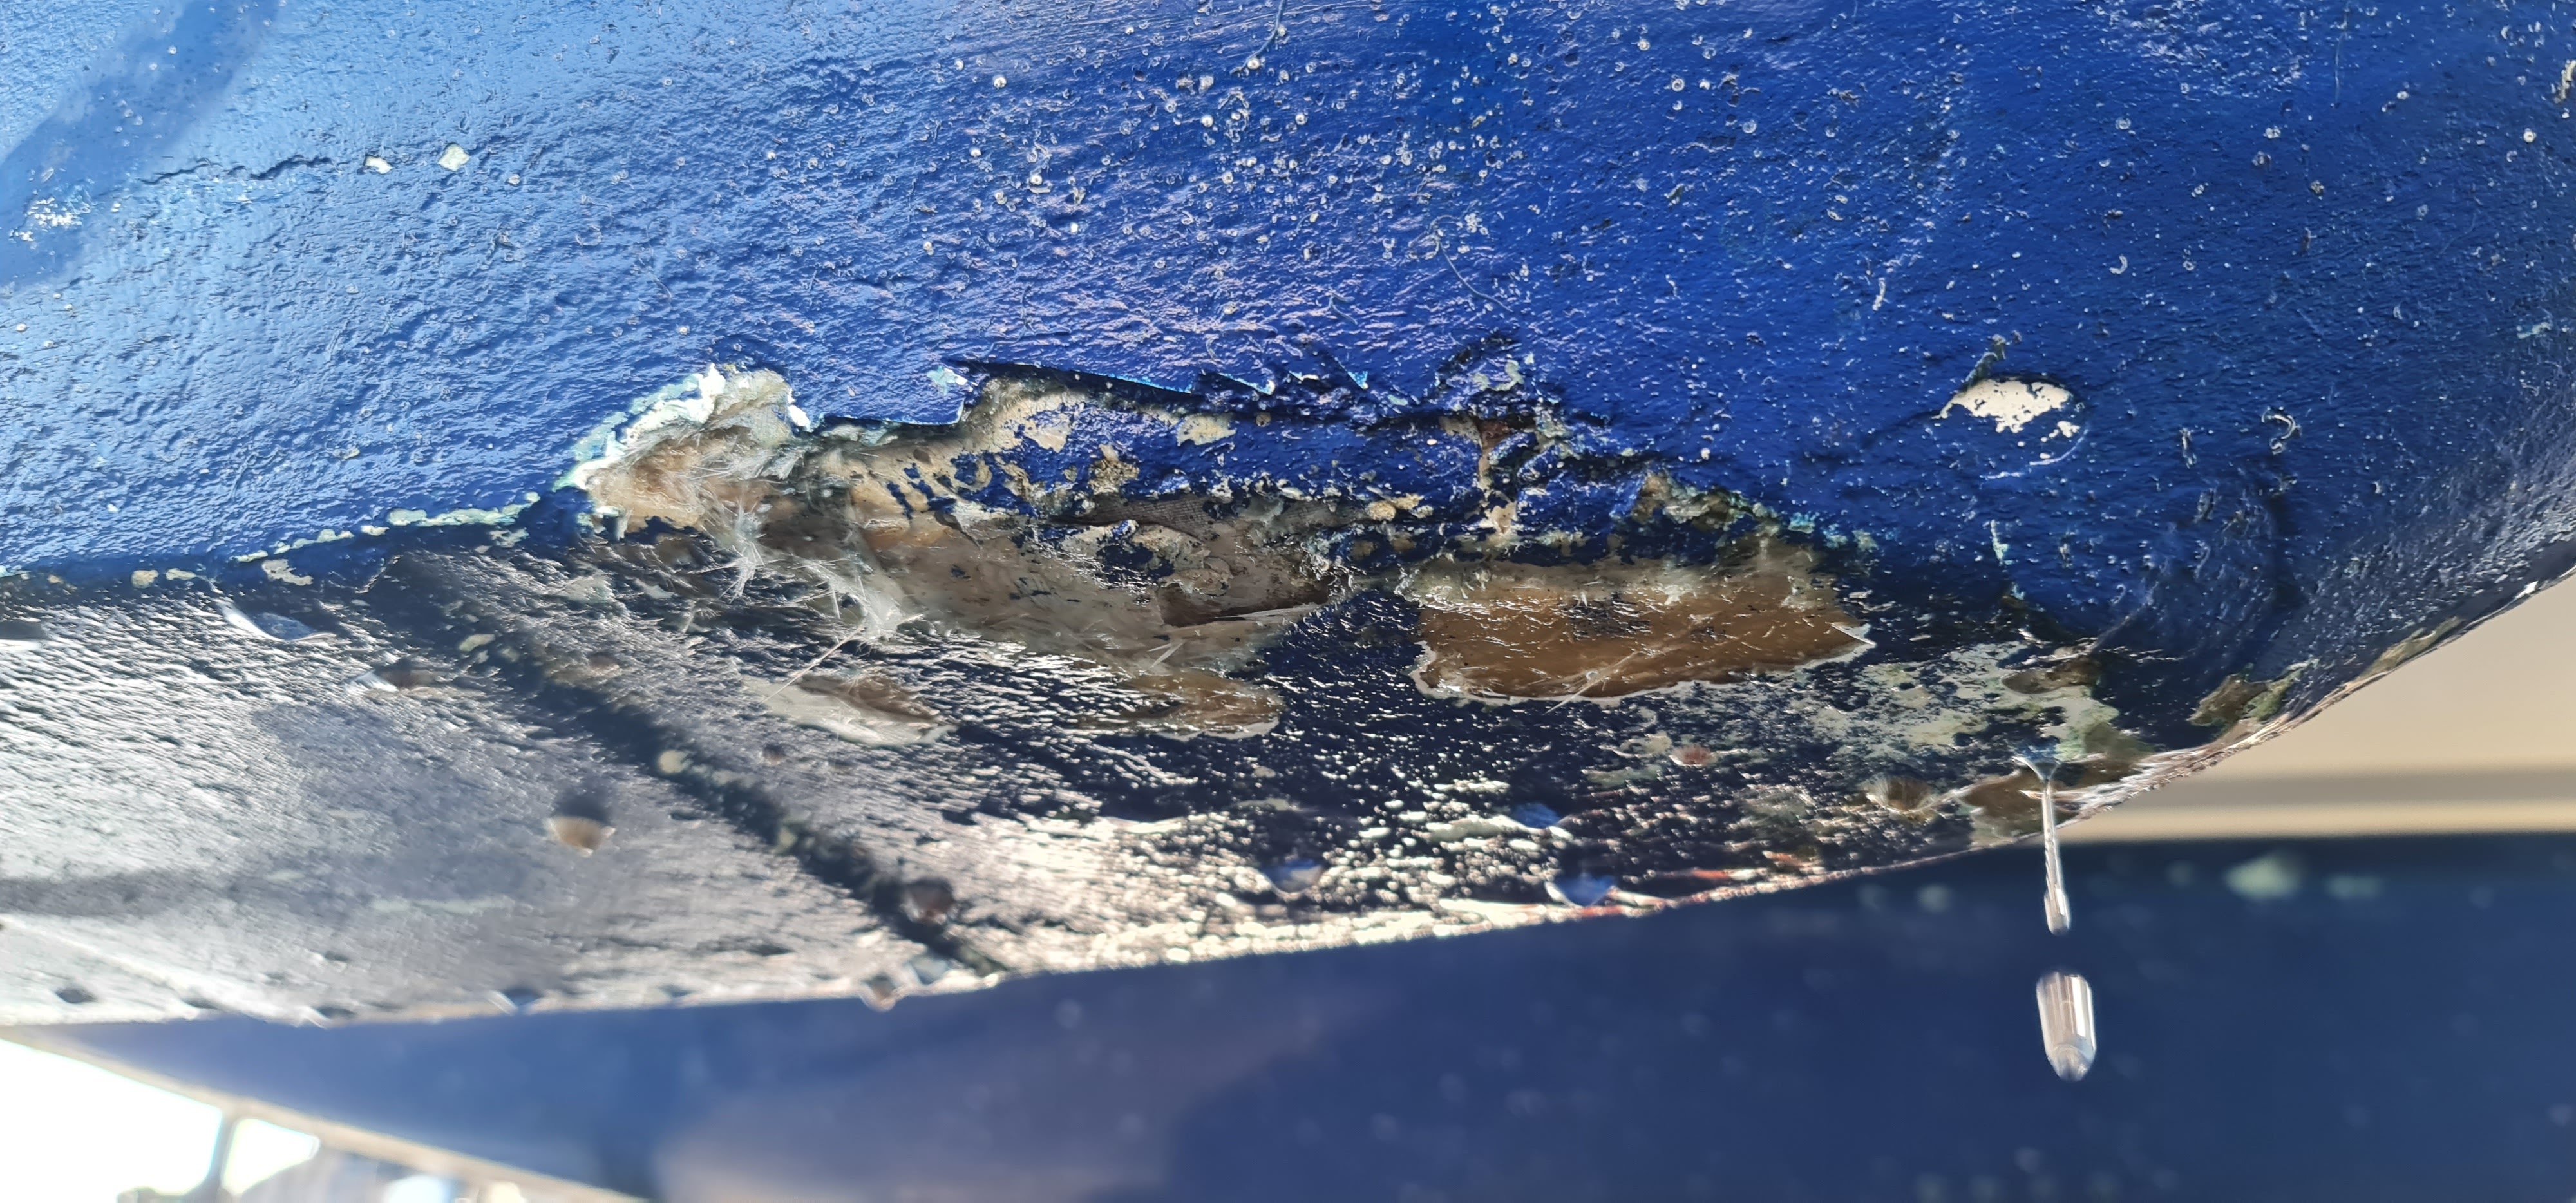
Two out of three original 175 l. water tanks suffered topside leak within the next quarter in 2020. As they were strongly fixed along the infamous front bulkhead, we think it could have something to do with this. Otherwise, there are no explanation for these simultaneous failure in both hulls.
While the Port side one was quite straightforward to replace, the Starboard tank, just next to the owner’s bathroom (see photo below), needed some furniture dismounting (the left ones when facing the bathroom). With a little online help, this was a 2 hours work for 2 persons.
Additionally, we plan on cleaning both fuel tanks, a good precautionary decision for the new owners, as it had never been done since the boat was delivered in 2011.
Hull & deck
Because of the Covid situation, the first owner couldn’t take the boat out of the water last Spring, so the hull needed quite a deep treatment. And on top of this, we discovered that some small surface repairs needed to be done on one of the rudders.
On top of doing the hull, we plan on also polishing the deck.
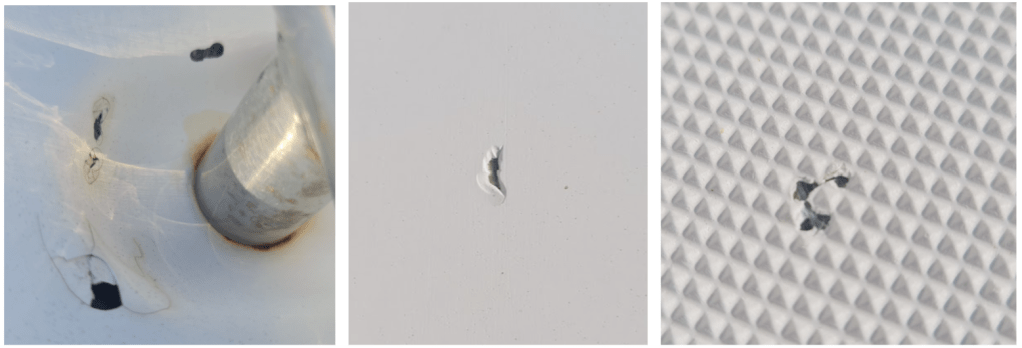
Gelcoat
Last September, the initial owner encountered a very strong hailstorm, and some gelcoat damage was done in quite a few places, on top of older ones. We plan on making all of these invisible to the new owners.
There are many other work planned for this boat, including changing a couple of deck hatches, some deckware, a global revision and the engines and the genset etc. The idea of this refit project is for the new owners to step on-board a truly personalized Lagoon 450F by mid-march, so that they can have their maiden journey from Licata to their booked slip in Trapani by mid March.
It is an ambitious project for us, and we are under a lot of pressure to deliver on time with our usual standard of quality. We’ll keep you posted with the most significant jobs.
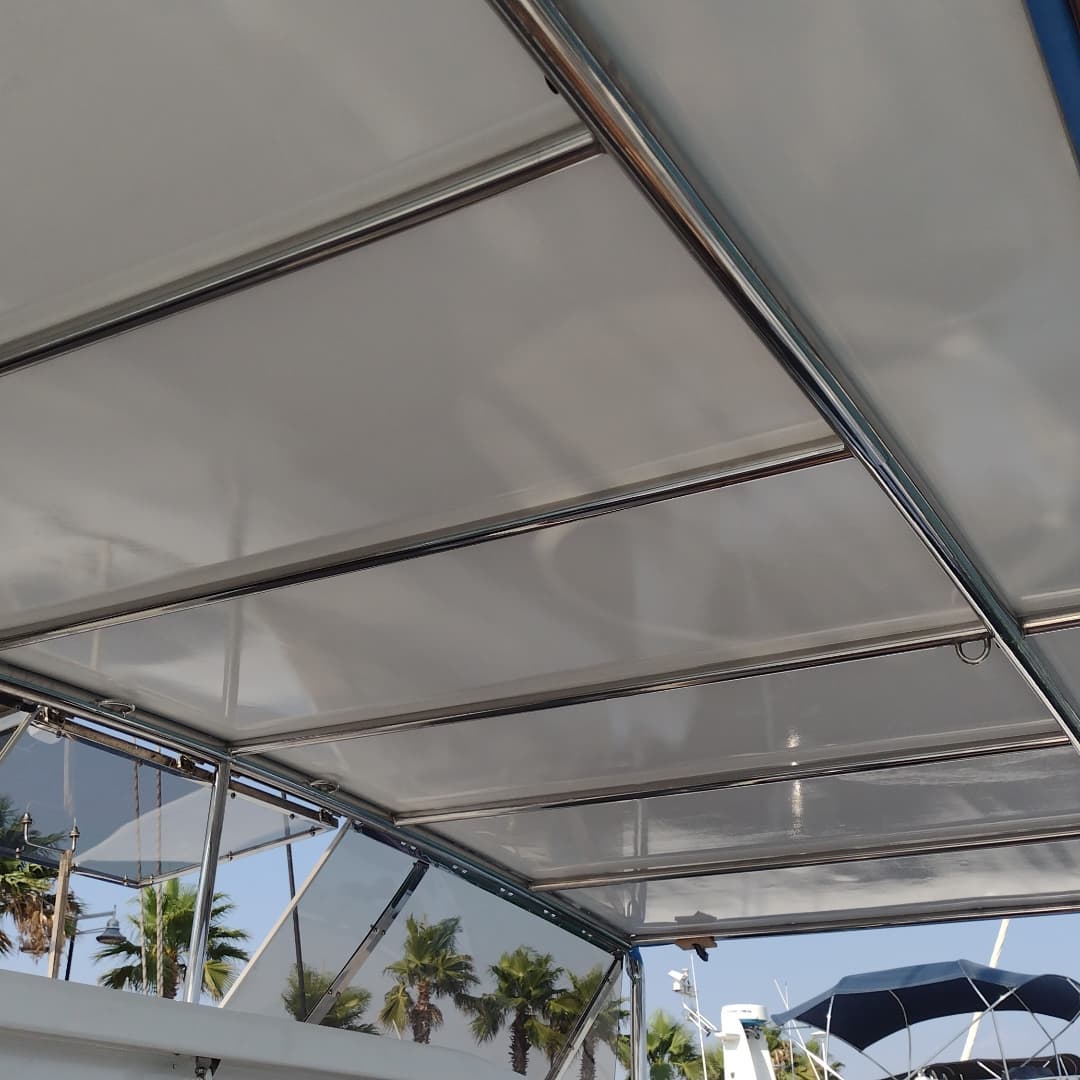
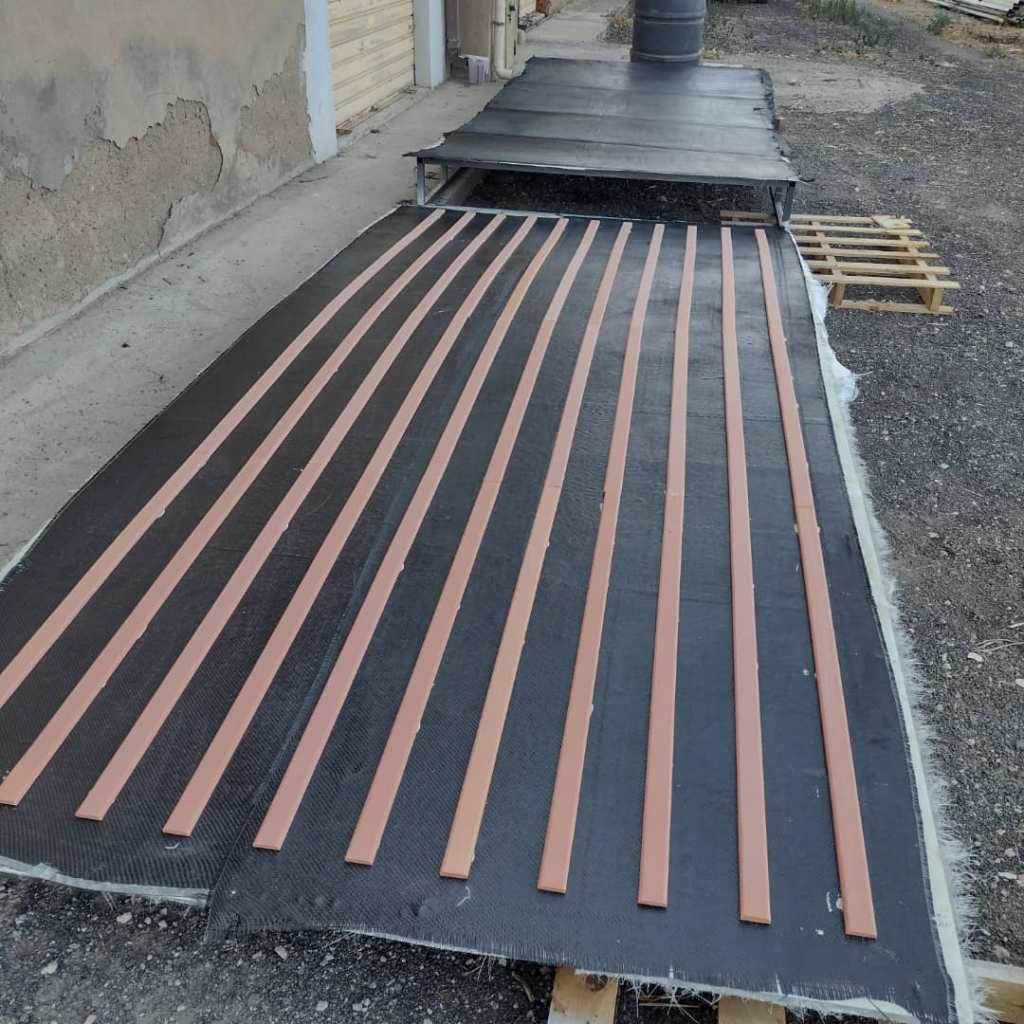
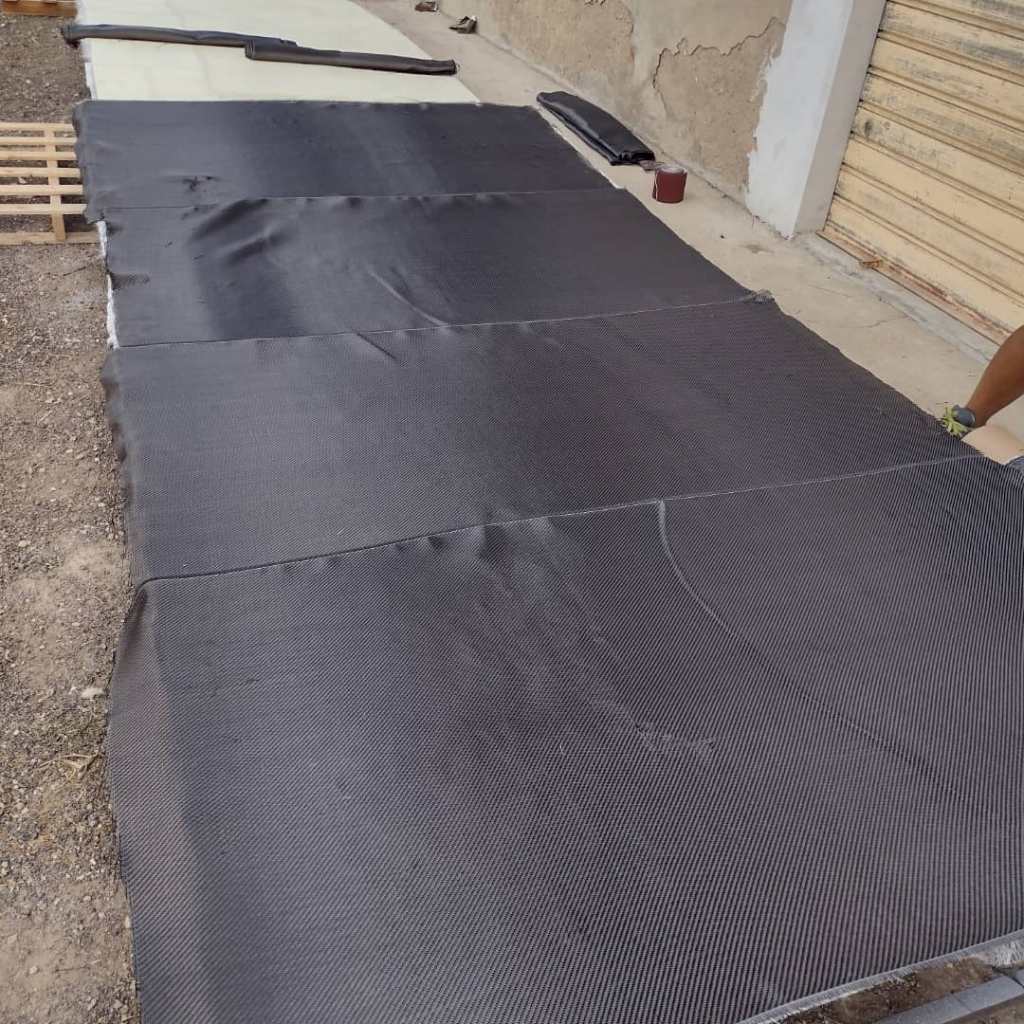
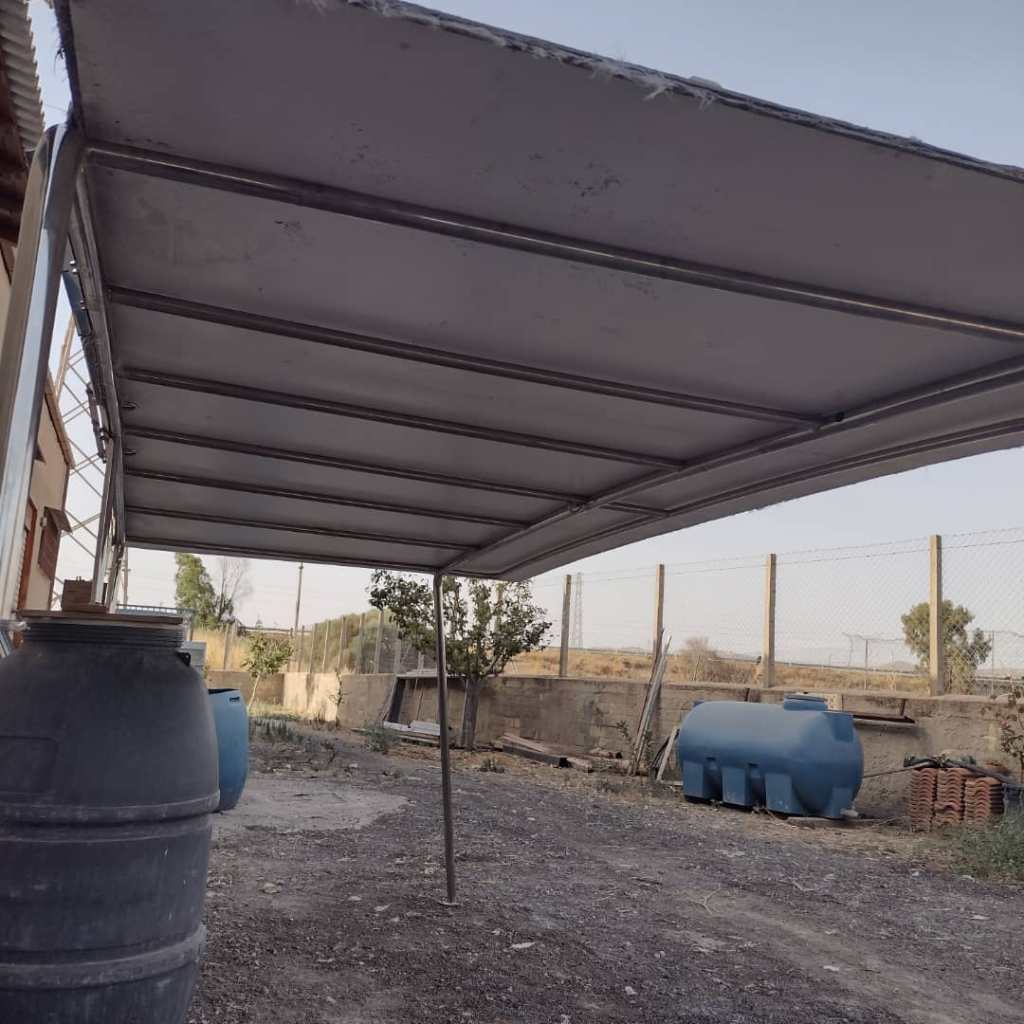
This is a project we made last October, but we didn’t add it to the web site at the time. It was a very interesting project, as we needed to find a solution both very light and very strong. Both contradictory goals, given its 3,7m X 1,7m dimension.
After giving it some thoughts, carbon fiber was the best solution, as it allowed for only 1,5 cm thickness, optimizing the weight/strength ratio.
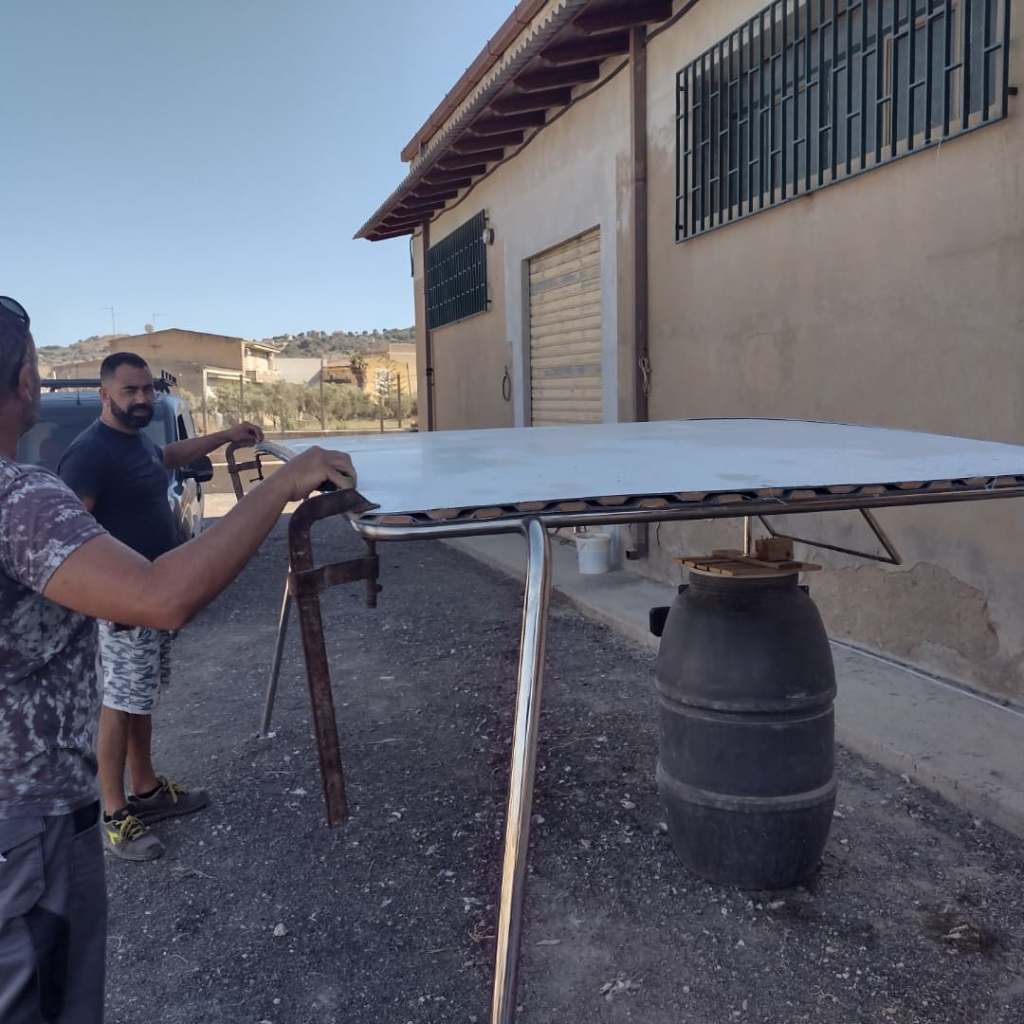
We tested the result out of our workshop, to check that every dimensions would fit on the boat.
Then it was time to organize the transportation to the Marina. It wasn’t heavy at all due to the carbon structure (50kg only !), but quite large.
This is our best part, when the new Bimini fits so perfectly on the Catamaran that we have the feeling it has always been here. The owners were very happy with the new Bimini, and on our part we felt proud of the result. Check-it out by yourself.